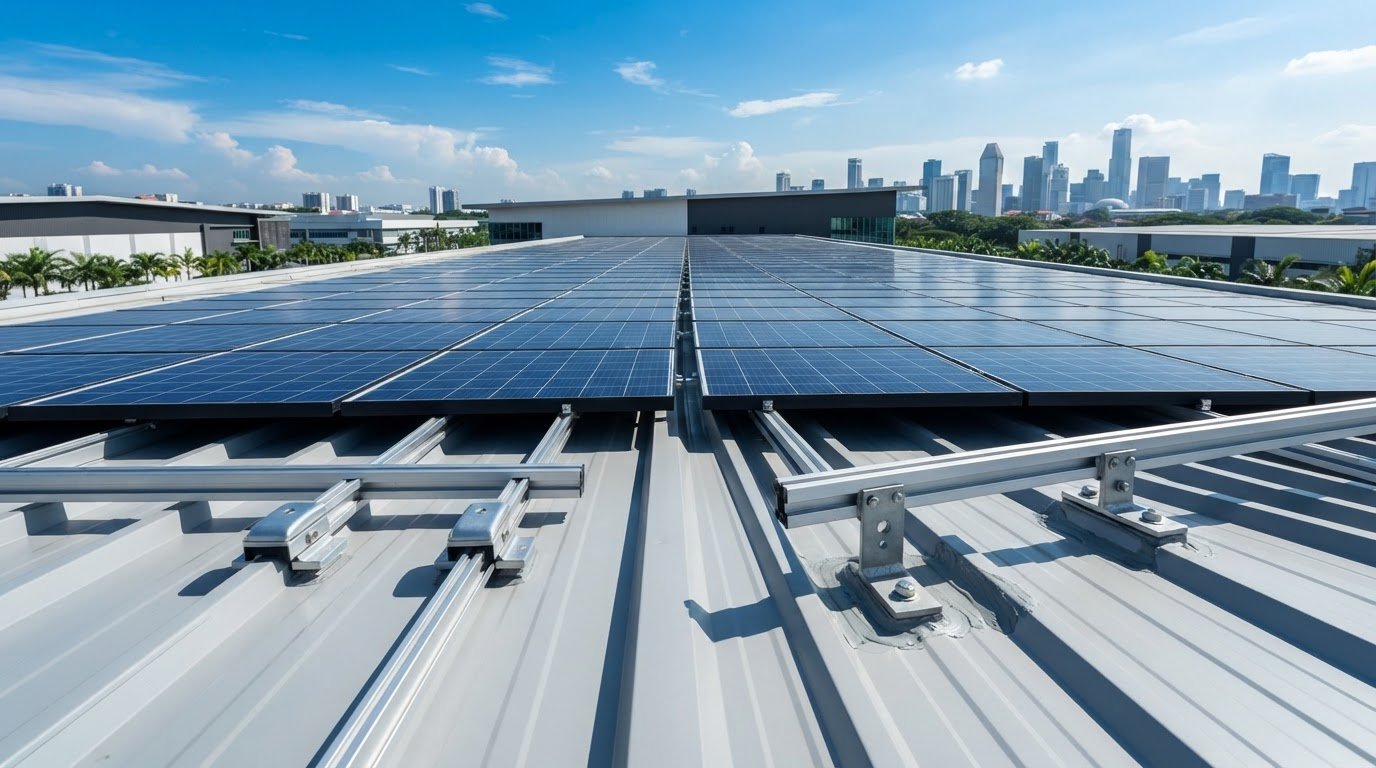
What if an attachment that looks like the simplest fit is incompatible with the roof profile? Choosing solar mounting systems for metal roofs starts with the roof, not the hardware catalogue. Seam shape, panel layout, roof construction and project loads all influence the attachment choice.
It’s reasonable to focus on roof penetrations, water ingress and long-term movement. Clamps can avoid penetrations on compatible standing-seam roofs, while penetrative brackets may suit other roof configurations. Neither approach is universal: the profile, fixing method and system requirements must align.
This guide explains which roof and module details to assess before specifying hardware. It compares clamp-based and penetrative approaches, then shows how to organise project requirements for review. SM Solar supplies standing seamlock roof clamps and roof mounting brackets for metal-roof PV projects.
Key Takeaways
- Use the roof profile and supporting structure to narrow attachment options before selecting hardware.
- Trace the load path from modules through mounting components to the roof structure, accounting for project-specific design requirements.
- Compare standing seamlock clamps and roof mounting brackets by roof geometry, attachment method and compatibility requirements.
- Build a review checklist covering roof-sheet details, supports, module layout and documented hardware compatibility.
- Specify solar mounting systems for metal roofs as part of the complete PV hardware schedule, separating confirmed component categories from project quantities and requirements.
Solar Mounting Systems for Metal Roofs: Start with the Roof Profile
A solar mounting system connects PV modules to a roof structure. Components may include roof attachments, rails or brackets, module clamps and accessories. The roof attachment transfers forces from the array to the building’s supporting structure, so identifying the metal-roof profile is the first selection step. Choosing a clamp, bracket or rail before recording the roof geometry can lead to a mismatch at the attachment point.
Profile-specific compatibility is central to metal-roof mounting selection: the attachment must engage with the roof geometry and connect appropriately to its supporting structure. Standing seamlock roof clamps and roof mounting brackets are distinct hardware categories, not universal solutions for every metal roof.
How standing seam, corrugated, and trapezoidal profiles differ
Standing seam roofing has raised, continuous seams where adjacent panels join. Corrugated roofing has a repeating wave pattern of rounded crests and troughs. Trapezoidal roofing has raised ribs with flatter tops, angled sides and flatter pans between them. These visible forms indicate how a mounting attachment might interface with the sheet, but appearance alone doesn’t establish compatibility.
Before comparing mounting designs, record the profile shape and dimensions, seam or rib spacing, sheet material and thickness, fixing arrangement, and the location and spacing of supporting members. Note roof condition and any obstructions that affect the planned array. These details help distinguish profiles that look similar but present different attachment surfaces.
- Identify whether the roof is standing seam, corrugated or trapezoidal.
- Record the seam, crest, trough and pan geometry relevant to the attachment.
- Document sheet and support details for project review.
What a metal-roof mounting system connects
The connection sequence typically runs from the roof attachment to a rail or bracket, then to the PV module interface. Some designs use rails; others use a more direct attachment arrangement. The right configuration depends on the roof and system design. Roof clamps attach mounting hardware to a compatible roof feature. Module clamps secure the PV module to a rail or designated mounting interface. They perform different functions and aren’t interchangeable.
Accessories complete the connection according to the selected system. Their role and placement depend on the hardware configuration, module dimensions and layout. For the module-side interface, review the panel’s relevant dimensions and mounting details alongside its electrical characteristics. The monocrystalline solar panel technical overview provides context for evaluating monocrystalline modules in a PV project.
A useful general reference is Photovoltaic mounting systems, which outlines common components and roof-mounted arrangements. For project selection, start with a measured roof profile and documented support details. Match those inputs to the intended attachment and module interface. Don’t assume a clamp that fits one seam, rib or sheet configuration will suit another.
How Metal-Roof Mounting Transfers Loads and Protects Roof Integrity
A mounting design must account for how forces travel from the PV array into the building. The load path typically runs from the module through its module clamps to a rail or bracket, then through the roof attachment and into the roof structure. Every connection matters. A secure-looking attachment to the metal sheet alone doesn’t establish that the roof assembly can carry the system’s design loads.
The supporting roof structure, not sheet appearance alone, informs whether a mounting arrangement can transfer project loads appropriately. This distinction is central to evaluating solar mounting systems for metal roofs.
Load path and structural assessment
Roofing sheets may span between purlins or other supports, so assess the sheet and the building’s supporting structure as separate parts of the load path. Review available roof drawings, construction details and project design criteria. The assessment should account for array dead load and wind uplift, with the design professional determining applicable demands and capacities for the specific building and layout.
- Locate purlins, rafters or other supporting members using drawings or verified site information.
- Record sheet construction, support spacing and attachment details.
- Provide the array layout, module configuration and project design criteria for structural review.
Wind can impose uplift on the array and transfer force through the attachments to the roof structure. Dead load acts continuously through the same path. Neither should be assessed using a generic load or span assumption: roof condition, support arrangement, attachment locations and project requirements all affect the review. Any proposed capacity, span or load figure needs engineering verification against the actual roof and mounting configuration.
Movement matters, too. Metal roofing can expand and contract as its temperature changes. The mounting layout and attachment details should accommodate movement in line with the roof construction and system design, rather than restraining the sheet in a way that creates unwanted stress. How movement is managed depends on the roof profile and attachment arrangement.
Water ingress, corrosion, and material interfaces
Attachment details can affect roof integrity, particularly when a design penetrates the sheet or alters an existing fixing. Penetrations need details suited to the roof assembly; non-penetrating attachments still require profile and interface compatibility. Neither approach alone guarantees protection against water ingress. Review project documentation for specified sealing methods, coatings and fastener materials rather than assuming one detail applies to every roof.
Material pairing also warrants review. Dissimilar metals in electrical contact, with moisture present, can create conditions for galvanic corrosion. The actual risk depends on the materials and interface, so confirm compatibility using project and component documentation. Consider the roof sheet, attachment, fasteners and any protective coating as a system, and document any required separation or sealing details.
SM Solar supplies standing seamlock roof clamps and roof mounting brackets for project-led specification. Reviewing roof details alongside the proposed attachment helps organise the information needed for design and procurement. Explore metal-roof mounting hardware as part of that project review.
Standing Seam Clamps vs. Roof Brackets: Compare by Metal-Roof Type
Attachment selection starts with comparing documented roof construction against the mounting hardware’s intended interface. Standing seamlock clamps are an option to assess on compatible standing-seam profiles. Roof mounting brackets may be considered for other metal-roof geometries, subject to their attachment design and the supporting structure. Neither category is a universal fit.
The comparison below separates an initial profile-based evaluation from the checks needed to make a project-specific selection. Suitability depends on documented compatibility and engineering review.
Standing seam profile
Attachment principle: A seam clamp engages the standing seam, rather than using the same fixing approach as a bracket attached through the roof sheet. Design checks: Seam geometry, clamp interface, structural requirements and manufacturer documentation. Limitations: A clamp intended for one seam configuration cannot be assumed to suit another.
Corrugated profile
Attachment principle: A roof bracket’s interface and fixing method must correspond to the corrugated sheet and project design. Design checks: Sheet profile, attachment location, roof integrity and supporting structure. Limitations: The general label “corrugated” isn’t enough to select a bracket. Geometry and fixing details matter.
Trapezoidal profile
Attachment principle: Bracket selection depends on the specific rib and pan geometry, as well as how the attachment connects to the roof assembly. Design checks: Roof shape, fixing method, structural requirements and relevant documentation. Limitations: Similar-looking profiles may not share an attachment interface or suitable fixing arrangement.
When standing seamlock roof clamps enter the evaluation
Evaluate standing seamlock roof clamps when the roof has a standing-seam profile that matches the clamp’s documented interface. Record the seam shape and dimensions, then compare them with the manufacturer’s documentation. Review how the clamp transfers loads and whether the proposed arrangement meets project structural requirements. SM Solar supplies standing seamlock roof clamps as a hardware category; this doesn’t mean every clamp suits every standing-seam roof.
When roof mounting brackets may be considered
For corrugated and trapezoidal roofs, assess brackets against the actual sheet geometry and specified attachment method. A penetrative approach passes through the roof sheet; a non-penetrative approach relies on another compatible interface. Both need roof-specific evaluation. Include the fixing detail, roof-integrity implications, connection to the supporting structure and engineering review in the comparison.
For solar mounting systems for metal roofs, use the profile to establish which attachment categories merit review, then compare the documented interface and design requirements. A practical selection record should identify the roof type, proposed attachment, fixing approach, structural assumptions and supporting documentation. This gives the specification stage a clear basis for evaluating clamps or brackets without treating visual similarity as proof of fit.

Metal-Roof Solar Mounting Specification: A Project Review Checklist
A procurement-ready mounting specification translates site information into documented component requirements. It should let a reviewer follow the connection from roof construction to PV module and identify the design assumptions behind the selected attachment. A complete mounting specification combines roof, structure, module and attachment data. Use the sequence below to assemble that record before finalising hardware quantities.
- Survey the roof. Record the profile, sheet construction, condition and relevant dimensions. Note seams, ribs, troughs, existing fixings, penetrations and obstructions that could affect attachment locations.
- Document the supporting structure. Capture available drawings and verified details for purlins, rafters or other supports, including their locations and relationship to the roof sheet. Flag missing information for project review instead of assuming the sheet alone provides the required support.
- Define the array layout. Include module dimensions, orientation, row arrangement and intended attachment locations. Show how the layout relates to roof features and supports so component placement can be reviewed against site conditions.
- Capture design inputs. Include project engineering criteria and relevant environmental exposure information, such as wind demands and moisture conditions. Use criteria supplied for the specific project; don’t substitute generic load, span or capacity assumptions.
- Record the proposed assembly. Identify the roof attachment, rail or bracket arrangement, module interface and associated hardware. List the documentation used to support compatibility and note any engineering review still required.
Record roof and project inputs
Keep the roof survey, structural information and module layout together as one review package. Include photographs or marked-up drawings where they clarify attachment locations, roof features or support positions. Record the source of each structural detail, such as a project drawing or verified site information, so reviewers can distinguish measured inputs from assumptions. Add project exposure and design criteria from the engineering brief.
Check component interfaces and documentation
Compare the proposed clamp or bracket with the documented roof profile and attachment method. Then review the complete connection: attachment to roof, rail or bracket interface, module clamp, fasteners and material pairings. Keep load values, spans and compatibility statements tied to project-specific engineering and component documentation. Record document references and unresolved assumptions alongside the hardware schedule.
This workflow turns site observations into a reviewable specification rather than a list of generic parts. For procurement, separate confirmed hardware categories from project-dependent quantities and technical selections. SM Solar supplies standing seamlock roof clamps and roof mounting brackets as part of its solar hardware range. Aligning the schedule with the recorded roof and module inputs supports a clearer project review without assuming a universal fit.
Explore roof clamps and mounting brackets for your metal-roof PV hardware specification.
Sourcing Metal-Roof Mounting Hardware for a Complete PV Project
Mounting hardware is one part of a coordinated PV bill of materials. Roof clamps or mounting brackets connect the array to the roof assembly; rails, module interfaces and related accessories complete the mechanical connection. Depending on the project architecture, the wider schedule may also include modules, inverters, batteries, charge controllers and circuit protection. Treat these as coordinated procurement categories, not interchangeable items.
For a broader procurement framework, the solar energy equipment supplier buyer’s guide covers considerations beyond the roof attachment itself. A project schedule should distinguish product categories from design-dependent details: quantities, exact component specifications and compatibility evidence should come from the project requirements, not be inferred from a category name.
Coordinate mounting hardware with adjacent system components
Start with the mechanical interfaces. The selected roof attachment connects to a rail or bracket arrangement, which must then interface with the PV module’s mounting points. Module dimensions and layout inform that coordination. Monocrystalline solar panels may appear in the same bill of materials as mounting components, but panel selection doesn’t establish roof-attachment compatibility.
Electrical equipment belongs in the broader system schedule, but serves a different function. Solar circuit protection devices support electrical system design; they don’t determine whether a clamp or bracket suits a roof profile. The solar circuit protection devices guide is a related procurement reference for that separate part of the project.
Prepare the handoff from specification to supply
A clear supply handoff should carry forward the documented roof profile, selected attachment approach, module layout, component interfaces and supporting review documents. Attach drawings or schedules that show intended locations and identify assumptions requiring project-specific review. This gives procurement a defined basis for distinguishing proposed hardware categories from the quantities and specifications set by the project.
- Mounting categories: roof clamp accessories, standing seamlock roof clamps and roof mounting brackets.
- Adjacent PV categories: monocrystalline solar panels, hybrid inverters, lithium LiFePO4 batteries, solar charge controllers and solar circuit protection.
- Project-specific schedule data: quantities, selected specifications and documented compatibility.
SM Solar is a wholesale distributor of solar hardware, including roof clamp accessories, standing seamlock roof clamps and roof mounting brackets. Its stated capabilities also include system integration. For solar mounting systems for metal roofs, carry a reviewed, project-specific attachment specification into the wider hardware schedule. Don’t assume universal fit or substitute category descriptions for verified component details.
Use the completed project schedule to review SM Solar’s solar hardware range alongside the documented mounting requirements.
Move from Design Review to a Project-Ready Hardware Schedule
Before procurement, turn the reviewed mounting design into a controlled project record. Keep the roof survey, attachment selection, component interfaces and supporting documentation together, and identify assumptions that still require resolution. This gives the project team a consistent reference as the specification moves from design review into the wider PV schedule.
For solar mounting systems for metal roofs, the next step isn’t simply choosing a part. Align documented project requirements with the relevant hardware categories, then carry that basis forward through procurement and coordination. Clear records make decisions easier to track as the project develops.
SM Solar’s wholesale solar hardware range includes roof clamp accessories, standing seamlock roof clamps and roof mounting brackets. Review SM Solar’s solar hardware range as you prepare the project schedule. A well-documented specification gives your team a practical foundation for the next stage.
Frequently Asked Questions
Can solar panels be mounted on any metal roof?
No. A metal roof isn’t automatically suitable for every PV mounting arrangement. The roof’s construction, condition, profile, supporting structure and attachment options all affect feasibility. For example, deteriorated sheets or inaccessible supports may need further assessment before hardware selection. The module layout and project design requirements matter, too. Treat each roof as a specific assembly, not simply as a generic metal surface.
Are standing seam roof clamps compatible with every standing seam roof?
No. Standing seam clamps must match the seam geometry and the clamp’s documented interface. Seam height, shape and joint construction can vary, so a clamp that fits one roof may not fit another. Compare product documentation with measured roof details, and include the intended attachment arrangement in the review. The term “standing seam” identifies a profile category, not a universal clamp dimension or compatibility guarantee.
Do solar mounting systems damage metal roofs?
Not necessarily, but an unsuitable attachment or poorly executed installation can affect the roof. Penetrative fixing introduces openings that require suitable detailing; clamp-based attachment still needs to match the seam and roof construction. For example, tightening an incompatible clamp may stress a seam, while an unsuitable fastener location may affect a sheet. Review the roof condition and attachment instructions before work begins. No mounting method should be assumed to be damage-free.
Can solar panels be mounted on corrugated metal roofing?
Yes, corrugated metal roofing can be considered for PV, but the attachment must suit the specific roof profile and structural arrangement. A bracket intended for a different rib shape may not seat or fix correctly. A practical review should distinguish the corrugation’s crests and troughs, locate the supporting members and document the intended fixing position. The mounting design then needs project-specific assessment, not selection by roof category alone.
Does thermal expansion affect solar mounting on metal roofs?
Yes. Temperature changes can cause metal roof sheets and mounting components to expand or contract, which may affect interfaces over time. The design needs to account for movement in a way that suits the roof assembly and attachment method. For example, a mounting layout shouldn’t inadvertently restrain a sheet where the roof design requires movement. Use component documentation and project design review to determine how movement is accommodated.
Do metal-roof solar mounting systems always require rails?
No. Some configurations use rails to support modules, while others connect modules through a more direct mounting arrangement. The suitable configuration depends on the attachment, module interface, roof profile and system design. Rails can provide a shared mounting path across attachment points, but they aren’t required for every project. Confirm that the complete hardware arrangement is compatible with the module and intended roof attachment.
Leave a Reply