Tag: solar panels

  • Solar Power Distribution: Practical System Guide 2026

    Solar Power Distribution: Practical System Guide 2026

    A solar array can generate power reliably and still fail to serve its loads if the distribution components don’t match. The term solar power distribution equipment covers hardware across different system scales and voltage levels, from DC-side protection and charge control to AC conversion and connection points. What moves power through a solar system, and how do the components fit together?

    The answer depends on the project’s topology, loads and grid connection. Solar system distribution hardware manages power within the installation; utility distribution infrastructure is a separate part of the electricity network. Defining that boundary helps prevent mismatched specifications and incomplete equipment schedules.

    This guide explains the functions and sequence of major components, then maps the DC-to-AC path for common system configurations. You’ll learn how panels, circuit protection, charge controllers, batteries and hybrid inverters fit together, and which interfaces need project-specific review. Use the guide to prepare an equipment schedule for technical review and procurement. SM Solar supplies solar hardware for off-grid and on-grid projects, including panels, batteries, controllers, protection devices and hybrid inverters.

    Key Takeaways

    • Separate solar power distribution equipment within a system from utility-scale transformers and medium- or high-voltage switchgear.
    • Trace the power path from generation through control, protection, optional storage and conversion to loads or the grid.
    • Compare grid-connected and off-grid priorities before building a bill of materials, because their equipment requirements differ.
    • Use project documentation to record topology, loads, storage needs, electrical ratings, connection types and protection requirements.
    • Match project needs to relevant hardware categories, including panels, charge controllers, batteries, circuit protection and roof mounting accessories.

    What Solar Power Distribution Equipment Covers, and What It Does Not

    Solar power distribution equipment is the hardware within a solar installation that routes, converts, controls, stores or protects electrical power between its source and intended loads or connection point. This system-level definition includes components that manage energy along the project’s electrical path. It does not mean every item in the wider electricity network belongs on the solar equipment schedule.

    The scope depends on the project topology, intended loads, storage design and connection requirements. A stand-alone system supplying local loads has different interfaces from a grid-connected system that can export power. Build the equipment list from the documented design rather than starting with a generic package that assumes every installation needs the same components.

    For a broad overview of how panels, inverters and other elements fit into stand-alone and grid-connected installations, see Photovoltaic System Components. The practical distinction is between hardware serving the solar installation and infrastructure serving the wider electricity network.

    Which equipment belongs to a solar power distribution system?

    Group components by their function. Panels generate electrical power. Charge controllers manage charging between a PV source and a battery where that arrangement is used. Batteries store energy, inverters convert DC power to AC where required, and circuit protection devices help protect electrical circuits. A system may include some or all of these categories, depending on its architecture and loads.

    • Generation: Solar panels supply power to the system.
    • Control and storage: Charge controllers and batteries serve designs that include battery charging and storage.
    • Conversion and protection: Inverters provide DC-to-AC conversion where needed, while circuit protection is selected for the documented circuits.

    This is a functional map, not a standard bill of materials. A project without battery storage won’t use the same component combination as one designed to store energy. In the equipment schedule, identify each component’s role and the interfaces it must support in the specific design.

    How DC-side hardware differs from utility distribution equipment

    DC-side solar hardware operates within the installation’s source, storage and load arrangement. Transformers and substations, by contrast, belong to the broader electrical network and may serve transmission or distribution functions beyond the solar array. Medium- or high-voltage switchgear, such as the medium-voltage equipment produced by manufacturers like Africa Switchgear & Transformers, is also network-level equipment, not another name for a solar circuit protection device.

    The difference is one of role and scale. A circuit protection device is selected for a particular circuit in a solar system; a transformer changes voltage between parts of an electrical network. They serve different interfaces and aren’t interchangeable procurement categories. Depending on the project, utility infrastructure may connect to a solar installation at its grid interface. That does not make network equipment equivalent to the installation’s DC-side hardware.

    To define the project scope, first set the solar system boundary: where generation enters, which equipment manages or converts power, whether storage is included, and where power is delivered. Then distinguish those components from any network-side equipment identified in the connection design. This keeps terminology precise and helps the equipment schedule reflect the actual topology, intended loads and connection requirements.

    How Solar Distribution Equipment Moves Power Through a System

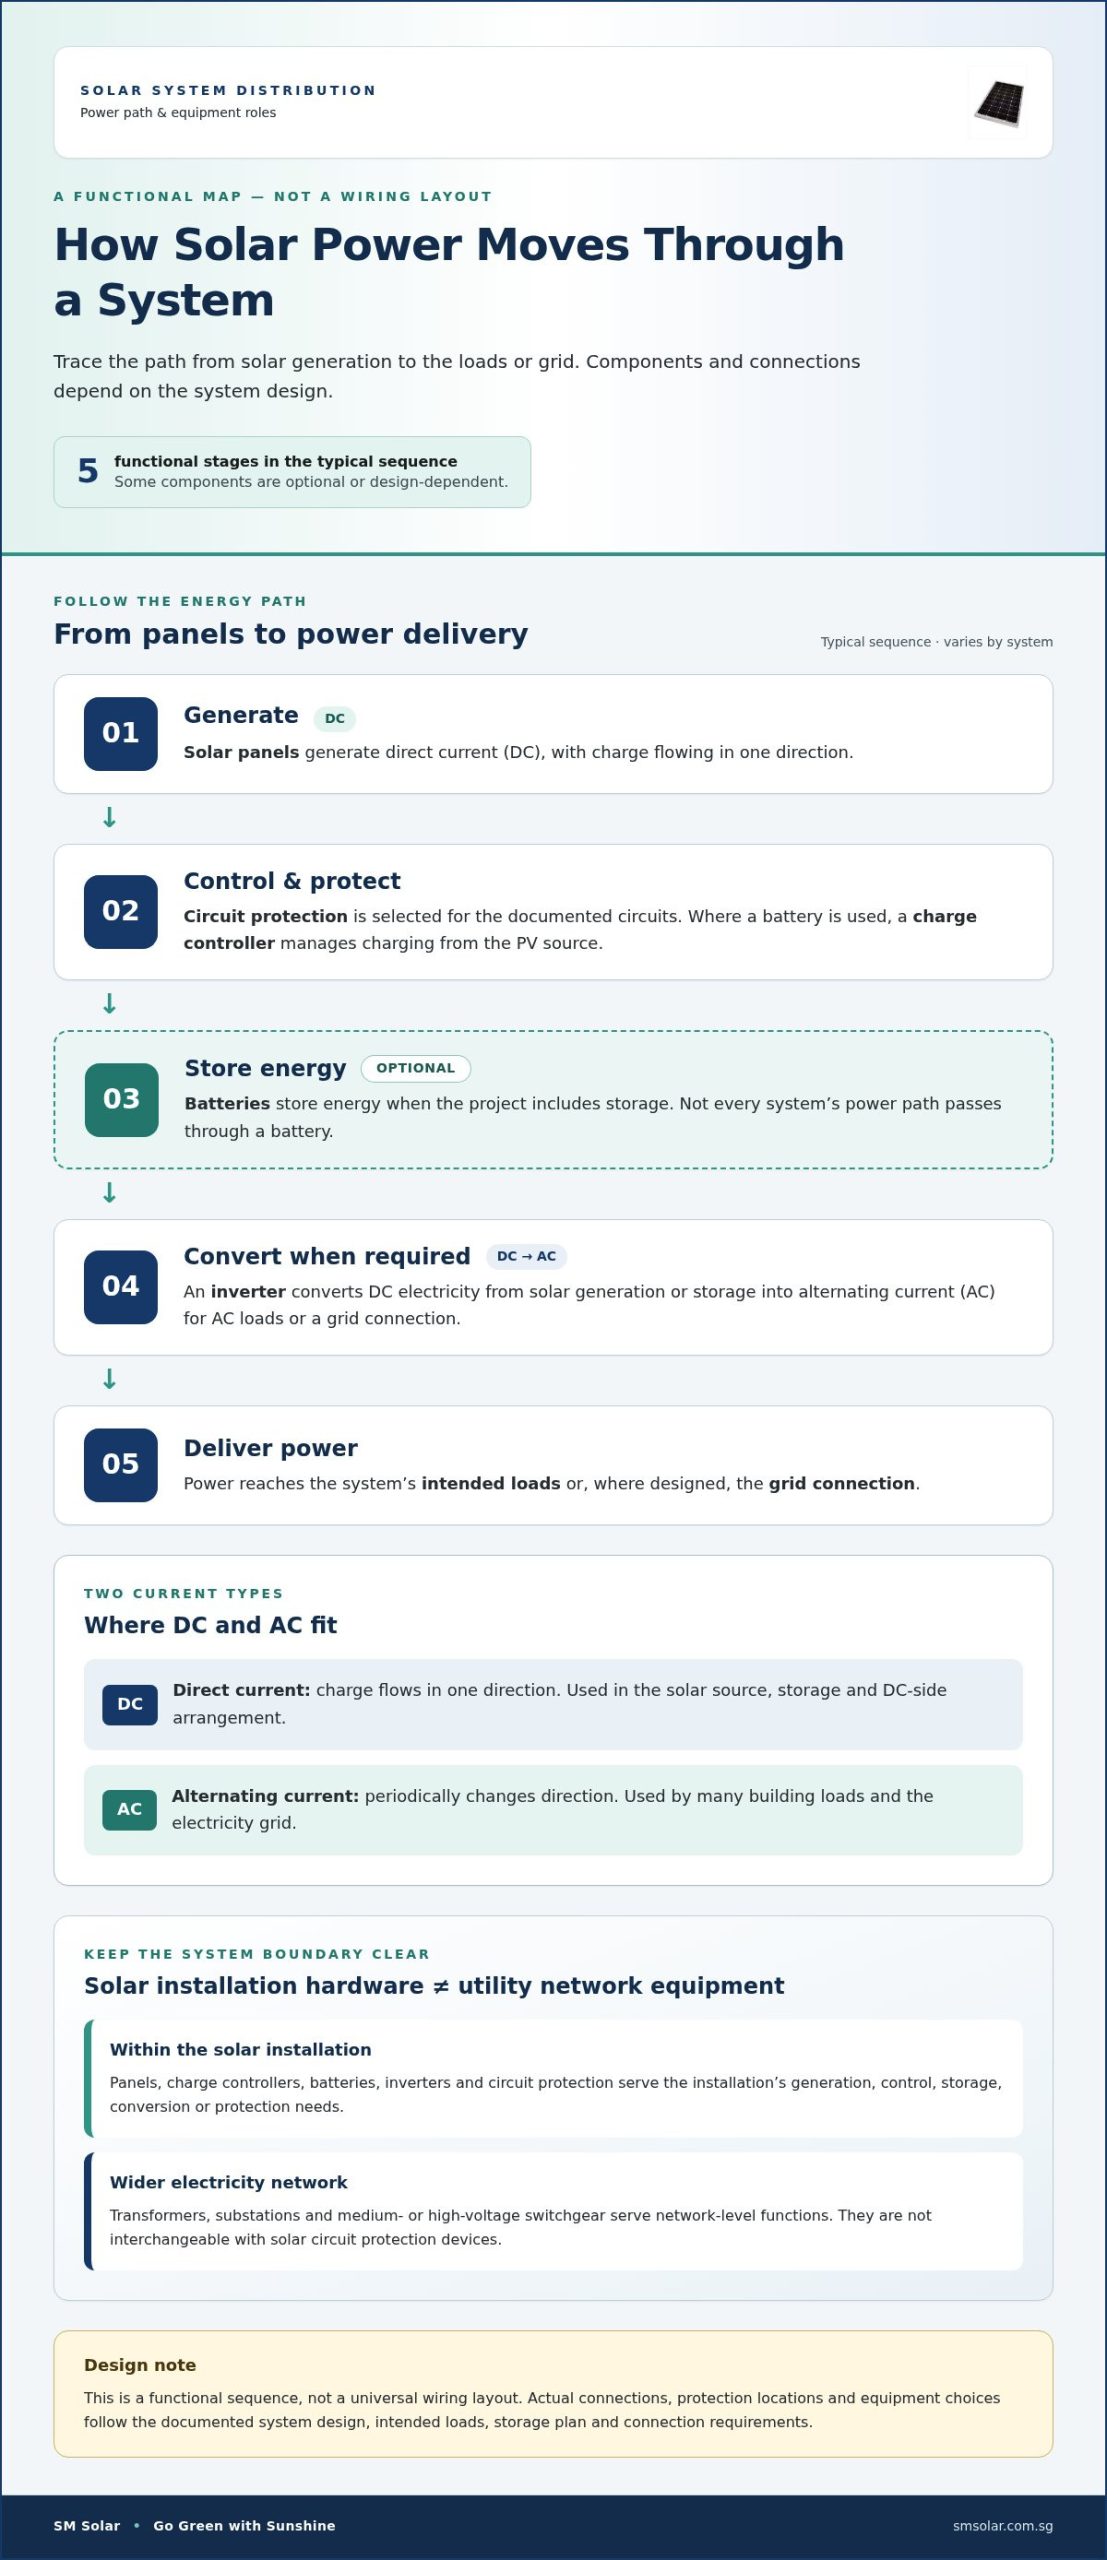
    Follow the energy path to see how the components relate. Solar panels generate direct current (DC), in which charge flows in one direction. Alternating current (AC), used by many building loads and the electricity grid, periodically changes direction. Where included, a charge controller manages charging from the PV source to a battery. An inverter converts DC to AC when the design requires AC loads or a grid connection.

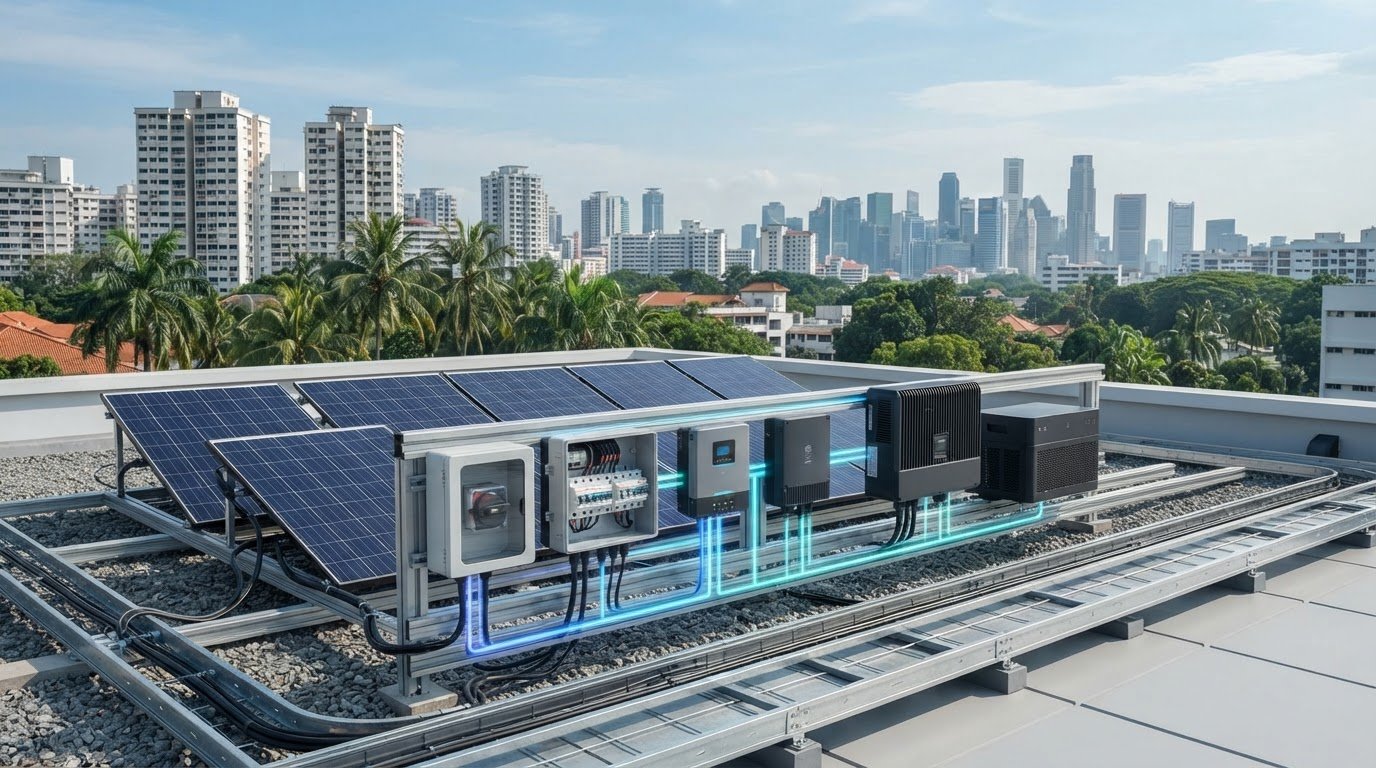
    A typical functional sequence is generation, DC-side control and protection, optional storage, conversion where required, then delivery to loads or the grid. This describes the roles of solar power distribution equipment, not a universal wiring layout. Actual connections and protection locations follow the system design and verified project documentation.

    From solar panels through charge control and storage

    A charge controller regulates the relationship between the solar panels and a connected battery, managing charging within the designed system. A battery is included when the project calls for energy storage. Its position and connection depend on the system architecture, so not every panel-to-load path passes through storage.

    Typical DC-side relationship where a battery is included:

    Solar panels → DC-side protection and control → charge controller → battery → inverter or DC loads

    This is a functional illustration, not installation instructions. Some systems use a different component arrangement or omit components that aren’t needed for their intended operation.

    Where inverters and protection devices fit

    An inverter converts DC electricity from solar generation or storage into AC electricity for AC loads. In a grid-connected design, the conversion equipment also forms part of the system’s interface with the grid. In an off-grid design, power is delivered to local loads, with storage included if the project requires it. The DOE Solar Energy Technologies Office discusses solar technology and grid integration, providing wider context on how a system can connect to the electricity network.

    Protection devices may be needed at relevant circuit and equipment boundaries on the DC side, AC side or both. Their selection and placement depend on the project topology and documented electrical requirements. Don’t treat a simple diagram as a protection schedule or assume one layout applies to every system. For component-level detail, consult the existing solar circuit protection guide.

    When preparing an equipment schedule, mark where generation enters, where control or storage occurs, where DC-to-AC conversion is needed, and whether power serves local loads, the grid or both. This makes interfaces clearer for technical review. Project teams sourcing panels, charge controllers, batteries, inverters and protection can also review SM Solar’s solar hardware range against their system design.

    Grid-Connected and Off-Grid Equipment: Compare the Design Priorities

    System topology determines where generated power can go and which equipment must manage that flow. A grid-connected system is designed to operate with an electricity network interface. An off-grid system serves loads without relying on that interface. Both use solar equipment, but their operating objectives differ. Treating them as interchangeable can leave a project schedule with components that don’t match the intended loads or operating conditions.

    The comparison below shows typical design considerations, not mandatory equipment lists. Storage, conversion and control requirements depend on the project architecture. For grid-connected projects, base grid-interface requirements on the project documentation and applicable requirements rather than assumptions taken from another jurisdiction.

    Design consideration Grid-connected system Off-grid system
    Power destination Local loads and, where the design permits, the grid connection Loads served within the standalone system
    Storage role Included when the project design calls for storage Often considered to support operation when solar generation and load don’t coincide
    Conversion Inverter interfaces solar DC power with AC loads and the grid connection as designed Conversion is selected to suit the required loads and system arrangement
    Control considerations Coordinate system operation with the defined grid interface and project requirements Plan charge control, storage use and supply against the intended load profile

    Distribution priorities in grid-connected systems

    In a grid-connected design, conversion equipment and the system interface support the movement of solar power to AC loads and the connection point. Storage may be included, but it isn’t an automatic requirement. Keep these general equipment functions separate from local interconnection rules, which depend on the project and market. Use project-specific documentation rather than applying standards or compliance assumptions from another jurisdiction as general guidance.

    For the equipment schedule, identify the grid interface, intended loads and any storage provision. Then align component roles with those documented requirements. A component’s presence in another grid-connected design doesn’t establish that it belongs in this one.

    Distribution priorities in off-grid systems

    Off-grid planning centres on supplying defined loads without a grid connection. Charge control and battery storage feature in many such designs, but requirements depend on how and when loads operate and on the intended operating conditions. Record the load profile and storage objective before settling on the equipment combination. SM Solar supplies hardware for off-grid projects; these applications provide context, not proof of a particular system’s performance.

    Select solar power distribution equipment against the project topology and load requirements, not a generic grid-versus-off-grid checklist. Review where power is needed, how the system will serve that demand, and which equipment functions the design actually requires. This gives technical reviewers a clearer basis for assessing component selection and interfaces.
    Solar Power Distribution: Practical System Guide 2026

    How to Specify Solar Power Distribution Equipment for a Project

    Build the equipment schedule from the project design, not from a standard product bundle. Before selecting solar power distribution equipment, establish the system topology, energy source, intended loads, storage requirements and operating conditions. Then use verified project documents to record electrical ratings, connection types and protection requirements. This ties component selection to actual interfaces and helps technical reviewers identify missing information.

    Minimum selection inputs: topology, source, loads, storage objectives, operating conditions, documented electrical ratings, connection types and protection requirements.

    Create an equipment schedule around system interfaces

    Give each item a defined function and identify what it connects to. Record the source document for its requirements, such as the project design or equipment documentation. Make dependencies visible too: a controller must suit the designed panel-to-battery relationship, while battery and inverter interfaces must align with the intended storage and load arrangement.

    Schedule field What to record
    Component and function Panel, charge controller, battery, inverter, or circuit protection device, with its role in the system
    Electrical interface Documented ratings and connection types for the relevant source, storage, load, or grid interface
    Dependencies Related components and design conditions that affect selection
    Project reference Drawing, specification, or other verified document supporting the recorded requirement

    Don’t fill gaps with assumed ratings or sizing rules. Flag missing values for technical review against the project documentation instead. This makes the schedule useful for procurement without treating a typical configuration as a universal specification.

    Review protection, mounting and procurement details

    Include circuit protection and relevant mounting accessories in the equipment schedule, even though they serve different functions. Protection items relate to electrical circuits and interfaces; pole mounts, roof clamps and brackets support panel mounting. Record the project basis for each selection. For device-specific considerations, refer to the solar circuit protection guide. For panel technology decisions, consult the monocrystalline solar panels technical overview.

    Before procurement, compare the schedule with the system drawings and confirm that every listed component has a documented purpose, interface and requirement. Review dependencies across panels, controllers, batteries and inverters as a set. This helps expose mismatches before purchasing and provides a traceable basis for technical review.

    For project teams assembling a schedule around solar hardware, review SM Solar’s solar equipment supply.

    SM Solar’s Role in Supplying Solar Power Distribution Equipment

    SM Solar is a wholesale distributor of solar hardware, with a core focus on 12 V DC solar products. For project teams building an equipment schedule, its portfolio covers key system functions: generation, charge control, storage, circuit protection, conversion and panel mounting. The right combination depends on the project design. It isn’t a fixed package that assumes every installation needs every component.

    SM Solar was established in 2008 and became a private limited company in 2016. The company supplies hardware for off-grid and on-grid projects, giving project teams access to components for different system arrangements. Its company profile also lists clients for off-grid and on-grid projects. These examples provide project context, not a performance claim about any particular system.

    A wholesale portfolio for solar project equipment

    SM Solar’s product categories can be mapped to equipment schedule requirements:

    • Generation: Monocrystalline solar panels.
    • Charge control and storage: Solar charge controllers and batteries, including Lithium LiFePO4 batteries.
    • Conversion: Hybrid inverters.
    • Electrical protection: Solar circuit protection.
    • Panel mounting: Solar panel pole mounts, standing seamlock roof clamps and roof mounting brackets.

    These categories support different parts of a system, but the schedule should reflect the project’s topology, intended loads and documented interfaces. A design with storage has different component dependencies from one without it; mounting accessories also depend on the selected installation arrangement. As a wholesale hardware source, SM Solar supplies project teams assembling component schedules around defined requirements, rather than a one-size-fits-all bundle.

    From equipment supply to project implementation

    For end users, SM Solar also provides system integration, installation and after-sales maintenance. These capabilities extend beyond component supply to project implementation and ongoing support. The company’s listed off-grid and on-grid client projects show experience in both application contexts, without implying that one system configuration or equipment set suits every project.

    For procurement planning, project teams can align the equipment schedule with the chosen system design, identify required categories and document interfaces for technical review. This creates a clearer basis for coordinating supply and integration requirements, whether the project is off-grid or grid-connected. SM Solar’s solar hardware portfolio includes panels, controllers, batteries, circuit protection, mounting accessories and hybrid inverters.

    Discuss solar power distribution equipment for your project and its equipment supply and integration requirements with SM Solar.

    Move Your Solar Project from Design to Procurement

    Turn the project’s design intent into a coordinated procurement brief. Bring the system drawings, load requirements, storage objectives and documented equipment interfaces into one review. Resolve open technical decisions before preparing purchase orders, so each item has a defined role and a traceable project requirement.

    A focused review also helps engineering and procurement teams work from the same component schedule. Together, they can identify dependencies and flag information that still needs technical resolution. This gives solar power distribution equipment selection a practical basis without relying on assumptions or generic packages.

    For project teams planning equipment supply alongside implementation, SM Solar can support discussions about project requirements and integration needs. Discuss your solar project equipment requirements and take the next step toward a coordinated schedule.

    With a clear brief and defined interfaces, your team can move forward with greater confidence.

    Frequently Asked Questions

    Is solar power distribution equipment the same as a distribution board?

    No. Solar power distribution equipment refers to the wider set of components that manage electrical power in a solar installation; a distribution board is one possible board or assembly within a system. Terminology can vary between project documentation and electrical designs. A schedule may, for example, identify a specific board separately from an inverter or protection device. Use the project drawings and equipment schedule to identify the intended component rather than treating the terms as interchangeable.

    Can an off-grid solar system operate without a battery?

    Yes, some off-grid designs may supply loads while solar generation is available without storing energy in a battery. Whether that arrangement suits a project depends on when power is generated and when loads need it. If loads must be served when generation is unavailable, the design may require storage or another defined supply strategy. Compare the load profile with the intended operating conditions before deciding whether a battery belongs in the system.

    What happens if an inverter cannot support the connected AC loads?

    The system may not operate the connected equipment as intended, but the specific result depends on the inverter and load characteristics. Check the inverter’s documented ratings against the loads and their operating requirements using project documentation. For example, the schedule should account for every AC load the design expects the inverter to serve, not just the equipment’s general category. Resolve any mismatch during design review rather than assuming a particular fault will occur.

    Does every solar system need a combiner box?

    No. A combiner box is not a universal requirement; whether it belongs in a design depends on the PV configuration, string arrangement and electrical design. A project with a different array layout may use a different arrangement. Don’t add one solely because it appears in another system’s equipment list. Refer to the system drawings and applicable project requirements to determine the intended configuration, without treating this answer as a wiring prescription.

    Can solar distribution components from different manufacturers work together?

    Potentially, but manufacturer names alone don’t establish compatibility. The relevant electrical ratings, connection interfaces, operating requirements and overall system design must align. For example, review the documented relationship between a charge controller and battery, as well as the interfaces between the inverter and connected equipment. Assess the equipment documentation and system schedule together. Without supporting technical information, don’t assume a particular combination is approved or suitable.

    What information should a project team provide when sourcing solar distribution equipment?

    Provide the system topology, intended loads, storage requirements, component interfaces and operating conditions, along with relevant drawings and specifications. These inputs help define a coherent equipment schedule and support technical review. For instance, clarify whether the system is grid-connected or off-grid and identify the equipment the design is intended to serve. SM Solar supplies solar hardware and provides system integration capabilities for projects requiring equipment coordination.
  • Photovoltaic System Components: How to Build a Compatible System

    Photovoltaic System Components: How to Build a Compatible System

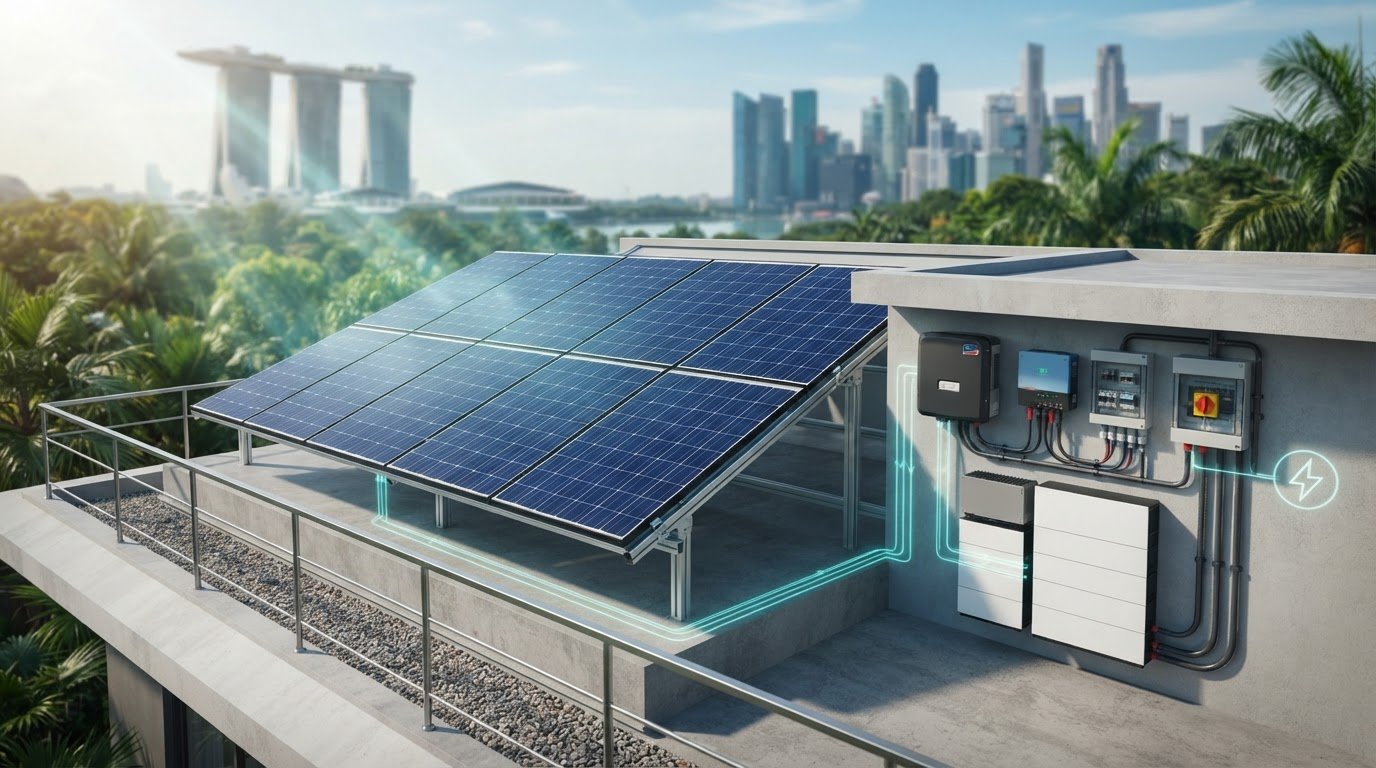
    What if the right solar panel still couldn’t make a system work? Photovoltaic system components must operate as a compatible electrical chain, not as a list of independently selected parts. Identifying panels, inverters, batteries and protection devices is straightforward. The harder task is tracing how power moves between them and checking that their electrical and mechanical interfaces match.

    This guide explains the main hardware groups and how they work together, from panel-generated DC power to conversion for loads or a grid connection. System architecture depends on project requirements: a grid-connected design may not need storage, while an off-grid or battery-backed system adds storage and associated control functions. Learn where solar charge controllers, hybrid inverters, LiFePO4 batteries, circuit protection and mounting hardware fit, and which compatibility points to review. Use the guidance to assess requirements and plan component sourcing alongside system integration.

    Key Takeaways

    • Identify the main photovoltaic system components by role, from generation and conversion to protection, mounting and optional storage.
    • Trace the power path through the system architecture and note where charge control and batteries fit when storage is required.
    • Assess compatibility by mapping each component’s upstream and downstream interfaces, electrical side and function.
    • Turn project requirements into a component plan by defining loads, selecting a topology and separating confirmed inputs from assumptions that need engineering review.
    • SM Solar supplies solar hardware and provides system integration capabilities, with a core focus on 12 V DC solar products.

    What Components Make Up a Photovoltaic System?

    Photovoltaic system components are the coordinated electrical and structural hardware used to generate, convert, protect, mount and, where required, store solar energy. The combination depends on how a project supplies loads and whether it connects to the grid, uses DC loads, includes batteries or combines these functions. A component list is only a starting point: each item has a specific role and interfaces with other parts of the system.

    Electrically, a system may include a direct-current (DC) path from the panels and an alternating-current (AC) path for compatible loads or a grid connection. The inverter, battery arrangement and charge-control equipment depend on the chosen topology, so not every system contains the same devices. Group the components of a photovoltaic system by their role in the energy path, then consider the structures that support the panels separately.

    Generation and power-conversion components

    Solar panels, also called PV modules, generate electricity by converting sunlight into DC power. Modules connect into an array, whose output feeds the next stage of the design. Monocrystalline solar panels are one type of panel used in PV systems.

    An inverter converts DC electricity into AC when the system supplies AC loads or interfaces with an AC network. A hybrid inverter can combine conversion and system-management functions, depending on its design and the system arrangement. In systems that charge batteries directly from a DC source, a solar charge controller regulates the charging connection between the PV array and battery. Its role differs from an inverter, although a system may use both.

    Storage, protection, and mounting components

    Batteries store energy for later use when storage is part of the project. A battery, such as a lithium LiFePO4 unit, needs to be considered as part of the system design, not added without checking how it connects to the other equipment. Circuit protection devices are selected and placed according to the circuits they protect and the points that require isolation.

    Mounting hardware has a structural role: it secures panels to a suitable support surface or structure. It does not generate, convert or store electricity. Choose the mounting method to suit the installation arrangement.

    • Electrical components: PV modules, inverters, charge controllers, batteries and circuit protection devices.
    • Structural accessories: Roof clamps, mounting brackets and pole mounts.

    For example, a roof-mounted array may use roof clamps or brackets, while a pole-mounted array uses pole-mount hardware. Account for both the electrical design and the mounting arrangement, but treat them as separate requirements. Keeping these categories distinct makes it easier to identify each item’s function before checking how its interfaces fit with the system.

    How Photovoltaic System Components Connect Across Different Architectures

    A PV system’s architecture determines how electricity moves from generation to the point of use. The general path starts at the PV modules, continues through conversion or charge-control equipment as required, and reaches loads through the system’s distribution arrangement. Storage adds another route for energy, while a grid connection provides an interface with the utility network. This sequence explains component roles, but it is not a wiring diagram: exact connections depend on the chosen topology and project specifications.

    Grid-connected and hybrid system pathways

    In a grid-connected arrangement, PV modules supply DC electricity to an inverter, which converts it to AC for compatible loads and the system’s grid interface. The inverter’s position and functions depend on the design. Distribution equipment routes power within the system. A grid connection does not mean every load is supplied in the same way, or that all systems use identical inverter and protection arrangements.

    A hybrid arrangement can coordinate PV generation, grid connection and battery storage. Depending on its design, a hybrid inverter manages conversion and energy flow between connected parts of the system. The battery stores energy, while the grid remains another system interface. Because configuration and energy pathways vary, the term “hybrid” alone does not specify the wiring or how the system prioritises power.

    • Grid-connected: PV generation is converted for AC-side loads and connection to the grid. Battery storage is not inherent to this arrangement.
    • Off-grid: The system supplies designated loads without relying on a grid connection as its normal supply path.
    • Hybrid: PV, storage and a grid connection can be coordinated within one architecture, subject to the equipment design.

    Off-grid systems and DC-side coordination

    In a battery-charging design, PV modules feed a charge controller, which manages the charging connection to the battery. The battery can then supply DC loads through the system’s distribution and protection equipment. If the project includes AC loads, an inverter converts DC power for those loads. This creates distinct DC and AC sections, each with its own equipment and interface requirements.

    DC-side coordination means matching the PV input, charge control, battery arrangement, protection and intended loads as a system. A 12 V DC design is one possible context, not a universal specification for off-grid systems. SM Solar focuses on 12 V DC solar products, and the project architecture should still reflect its requirements and selected equipment.

    Before selecting hardware, list each intended load by supply type and trace its proposed power path back to the PV array or storage. This makes conversion and charge-control needs visible early. SM Solar supplies solar components and system integration, including panels, controllers, batteries and circuit protection. Final wiring and equipment selection should follow the designed topology and project specifications.

    How to Assess Compatibility Between Photovoltaic System Components

    Compatibility is a system-level check, not a brand-name match. A component can suit its individual task yet still be a poor fit for the architecture or an adjacent device. Assess its function, the system topology, its electrical side and the project requirement separately. Then compare each interface with the actual equipment datasheets and design documentation.

    A simple interface matrix can expose gaps before components are specified or sourced:

    • PV modules: Upstream interface: sunlight and array configuration. Downstream interface: inverter or charge-control input. Compare module output characteristics with the connected equipment’s permitted input range.
    • Charge controller: Upstream interface: PV array. Downstream interface: battery. Check that the controller’s input and battery-charging specifications align with the array and battery design.
    • Battery: Upstream interface: charging equipment. Downstream interface: DC loads or inverter, according to topology. Review chemistry, system voltage and stated operating limits.
    • Inverter: Upstream interface: PV, battery or both, depending on type and design. Downstream interface: AC distribution and loads. Match its input requirements and output characteristics to the system plan.
    • Protection devices: These connect to the circuits they protect. Check their ratings and specified installation position against the circuit design.
    • Mounting hardware: This connects the panel to its supporting structure. Confirm that the attachment method suits the roof or pole arrangement and the relevant component specifications.

    Check electrical interfaces and operating requirements

    Start with the module datasheet. Compare its voltage and current characteristics with the connected inverter or charge controller, including the equipment’s stated operating limits. Nominal voltage alone is not enough: array configuration and operating conditions affect the values presented to downstream equipment. Check power ratings and use the equipment documentation to confirm that the proposed combination falls within its specified range.

    For battery charging, confirm that the charging equipment supports the battery chemistry and system voltage specified for the project. Review the battery’s charging requirements alongside the controller or inverter documentation. Protection-device selection also depends on circuit context. Verify ratings and placement against the design instead of treating devices as interchangeable because they serve the same broad function.

    Match mounting hardware to the installation structure

    Identify the roof type or pole-supported arrangement before selecting structural accessories. Standing seam roof clamps are intended for standing-seam attachment; roof mounting brackets suit roof-mounting arrangements where the specified interface fits. Pole mounts support pole-mounted configurations. These categories alone do not establish compatibility. Compare the panel attachment points, support structure and accessory documentation for the planned installation.

    Record the results in the matrix and reference the relevant datasheet or design detail. Mark unresolved values for engineering review rather than assuming that similar names, nominal ratings or physical appearance prove compatibility. This creates a traceable basis for comparing photovoltaic system components and identifying interfaces to resolve before procurement.

    Photovoltaic System Components: How to Build a Compatible System

    How to Translate Project Requirements Into a Component Plan

    Build the component plan from the project brief. Define what the system must supply, identify its architecture, then map each requirement to hardware and interface information. This keeps confirmed inputs separate from assumptions that need engineering review and gives procurement and technical teams a shared schedule to work from.

    Build the system brief before specifying hardware

    Record the load type and operating profile first: which equipment needs power, whether it uses DC or AC, and when it operates. Note whether the project has a grid connection, requires battery storage or is designed around DC equipment. Add installation constraints, including the intended mounting arrangement. If a load profile, connection detail or site condition is unknown, mark it as an open input rather than filling the gap with an assumption.

    1. Define loads. Record load type, supply type and operating profile. Separate confirmed requirements from missing information.
    2. Select topology. Establish whether the project is grid-connected, off-grid or hybrid, and whether storage is required.
    3. Establish interfaces. Identify DC and AC connections, equipment boundaries and structural attachment points that the design must accommodate.
    4. Map hardware categories. Assign components to generation, conversion, storage, protection and mounting, then note which specifications still need technical review.

    This brief helps distinguish primary requirements from optional design choices. For example, a DC-centred project and a project supplying AC loads may need different conversion equipment. Reflect that distinction in the component plan rather than assuming every topology uses the same equipment sequence.

    Create a component schedule for technical review

    Organise the schedule by function, keeping electrical equipment separate from structural accessories. For each item, record its role, upstream and downstream interfaces, relevant datasheet fields, and whether the information is confirmed or needs review. This makes gaps visible before sourcing and gives the team a basis for checking the selected photovoltaic system components as a coordinated set.

    • Generation: List PV modules, array configuration and module output fields. Use this monocrystalline solar panel technical overview for module-specific context.
    • Conversion and control: Record the inverter or charge-controller function, connection points and applicable input or output requirements.
    • Storage: If included, document battery chemistry, system voltage and charging interface. The guide to LiFePO4 battery storage provides related context.
    • Protection: Identify circuit locations and device requirements. Refer to the guide on solar circuit protection devices when developing this schedule section.
    • Mounting: List roof clamps, brackets or pole mounts separately, with the intended structure and attachment interface.

    Mark unresolved design values for engineering review. Use this structured component plan to discuss solar hardware and system integration with SM Solar.

    How SM Solar Supports Photovoltaic Component Supply and Integration

    SM Solar is a wholesale distributor of photovoltaic hardware and provides system integration, installation and after-sales maintenance for end users. These capabilities connect component supply with project-level planning. The company’s core product focus is 12 V DC solar products.

    Component categories within SM Solar’s supply range

    SM Solar’s supply range covers electrical hardware and supporting accessories used in different parts of a PV system. The categories below describe component roles, not individual model specifications. Project teams can use them to organise a component schedule before reviewing equipment interfaces and datasheets.

    • Generation: Solar panels, including monocrystalline panels, provide the PV generation hardware.
    • Control and conversion: Solar charge controllers and hybrid inverters support system arrangements that require charge control or power conversion.
    • Storage: Lithium LiFePO4 batteries and other solar battery categories support designs that include energy storage.
    • Electrical protection: Solar circuit protection devices form part of the system’s electrical hardware plan.
    • Mounting and accessories: Standing seamlock roof clamps, roof mounting brackets and solar panel pole mounts support different structural arrangements. Other DC-related products are also part of the supply range.

    Specify these categories against project requirements rather than treating them as a pre-set package. The solar energy equipment supplier guide provides related context for organising equipment requirements and planning supply.

    From hardware supply to system integration

    Component supply addresses the hardware list; system integration considers how the selected equipment fits within the project architecture. SM Solar provides system integration and installation, as well as after-sales maintenance for end users. These capabilities support a broader project scope while allowing the equipment configuration to reflect each system’s requirements.

    SM Solar’s client list includes 10 off-grid system clients and 5 on-grid system clients. This reflects work across both architecture types. Each project’s component plan still depends on its defined loads, topology, interfaces and installation requirements. The practical benefit is a connected view of component categories and their roles within an integrated system.

    For a clear review, prepare the project’s load and topology information, identify the required component categories, and record unresolved interface or specification questions. SM Solar can support project teams with solar component supply, system integration, installation and after-sales maintenance for end users.

    Move From Component Plan to Project Review

    Turn your component schedule into a project-ready sourcing brief. Record the intended architecture, required hardware categories and unresolved technical inputs together, so the review can focus on system fit rather than isolated product choices. This gives your team a clearer basis for coordinating specifications and procurement as the design develops.

    SM Solar was established in 2008. Use your project brief to connect requirements with the relevant photovoltaic system components and integration support. A structured review keeps sourcing decisions aligned with the intended configuration.

    Review SM Solar’s photovoltaic component range and discuss your system integration requirements.

    Frequently Asked Questions

    Can photovoltaic system components from different manufacturers work together?

    Yes. Components from different manufacturers can work together if their electrical and mechanical interfaces are compatible. Compare datasheet values, connector specifications, communication requirements where applicable, and operating limits. For example, a panel and inverter may have suitable nominal ratings but still need to be checked against the inverter’s permitted input range. Keep the relevant datasheets and compatibility decisions with the project documentation for future maintenance or replacement.

    Can a photovoltaic system power DC equipment directly?

    Yes, a PV system can supply DC equipment if its voltage and current requirements suit the designed DC supply. Panel output varies with operating conditions, so a direct connection is not automatically appropriate. A regulated supply, charge controller or battery arrangement may be needed to provide the required electrical conditions. Check the load specifications and system design before connecting equipment, especially if its operation depends on stable voltage.

    Are solar mounting components considered electrical components?

    No. Mounting components are structural accessories, not electrical devices. Their role is to attach and support the modules within the chosen installation arrangement. Roof clamps, mounting brackets and pole mounts address different structural interfaces. They still affect system planning because the panel and support arrangement must fit together, but they do not perform electrical conversion, storage or circuit protection. Keep them in a distinct section of a bill of materials.

    Can individual photovoltaic components be replaced without replacing the whole system?

    Often, an individual component can be replaced, but the replacement must suit the existing system. First identify the failed or obsolete item and document its connections, ratings and role. Then compare the replacement’s specifications with adjacent equipment and the system design. A change to an inverter, battery or controller can affect other interfaces, so include a technical review rather than relying on physical fit alone.

    What information should a photovoltaic component schedule include?

    A useful schedule identifies each item, its function, position in the system, upstream and downstream connections, and the source of its specification data. Include model identifiers once selected, relevant voltage, current and power fields, and mounting or attachment details where applicable. Mark each value as confirmed, pending or subject to engineering review. This makes procurement gaps visible and gives installers and maintenance teams a shared reference.

    How do DC and AC components differ in a photovoltaic system?

    DC components operate on the direct-current side, which may include PV modules, battery connections and DC loads. AC components serve alternating-current circuits, such as compatible loads supplied through an inverter. The distinction matters because equipment ratings, protection and connection methods depend on the circuit type. An AC load may require conversion from a DC source, while a suitable DC load may be served on the DC side.

    Does every photovoltaic system need a battery and charge controller?

    No. A grid-connected system can be designed without battery storage, and a charge controller is generally relevant when the design includes controlled charging of a battery from a DC source. Equipment configuration depends on the system topology and selected inverter or charging arrangement. Before specifying either item, establish whether the project requires stored energy and how the battery will connect to the rest of the system.

  • Solar Power Hardware Procurement: An EPC Project Guide

    Solar Power Hardware Procurement: An EPC Project Guide

    A solar hardware package is more than a list of individually capable products. It is a coordinated set of components that must meet the project’s electrical, mechanical and delivery requirements. Solar power hardware procurement can lose alignment when specifications are assessed in isolation, leaving EPC teams to resolve compatibility or scope gaps during integration.

    Panels, charge controllers, batteries, inverters, circuit protection and mounting hardware each have defined roles. The interfaces between them determine whether the package fits the system design. Supplier comparisons are more useful when they assess project fit, not just product features.

    This guide sets out a project-led framework for defining procurement scope against system requirements, comparing hardware and supply options using consistent criteria, and coordinating sourcing with integration and delivery planning. It covers the component categories to consider, the compatibility details that affect package selection, and how a hardware supply partner such as SM Solar can support planning across its DC-focused product range. The aim is to build the procurement process around project requirements from the start.

    Key Takeaways

    • Start solar power hardware procurement with the project’s system architecture, operating context and delivery requirements.
    • Map panels, charge controllers, batteries, hybrid inverters and circuit protection to the approved system design.
    • Compare supply options against consistent criteria, separating mandatory specifications from preferred supplier capabilities.
    • Use a controlled workflow from scope definition and offer evaluation through ordering, delivery coordination and receipt inspection.
    • Plan component packages around the project scope, including roof clamp accessories and other DC-related hardware.

    Solar power hardware procurement: define the project before sourcing

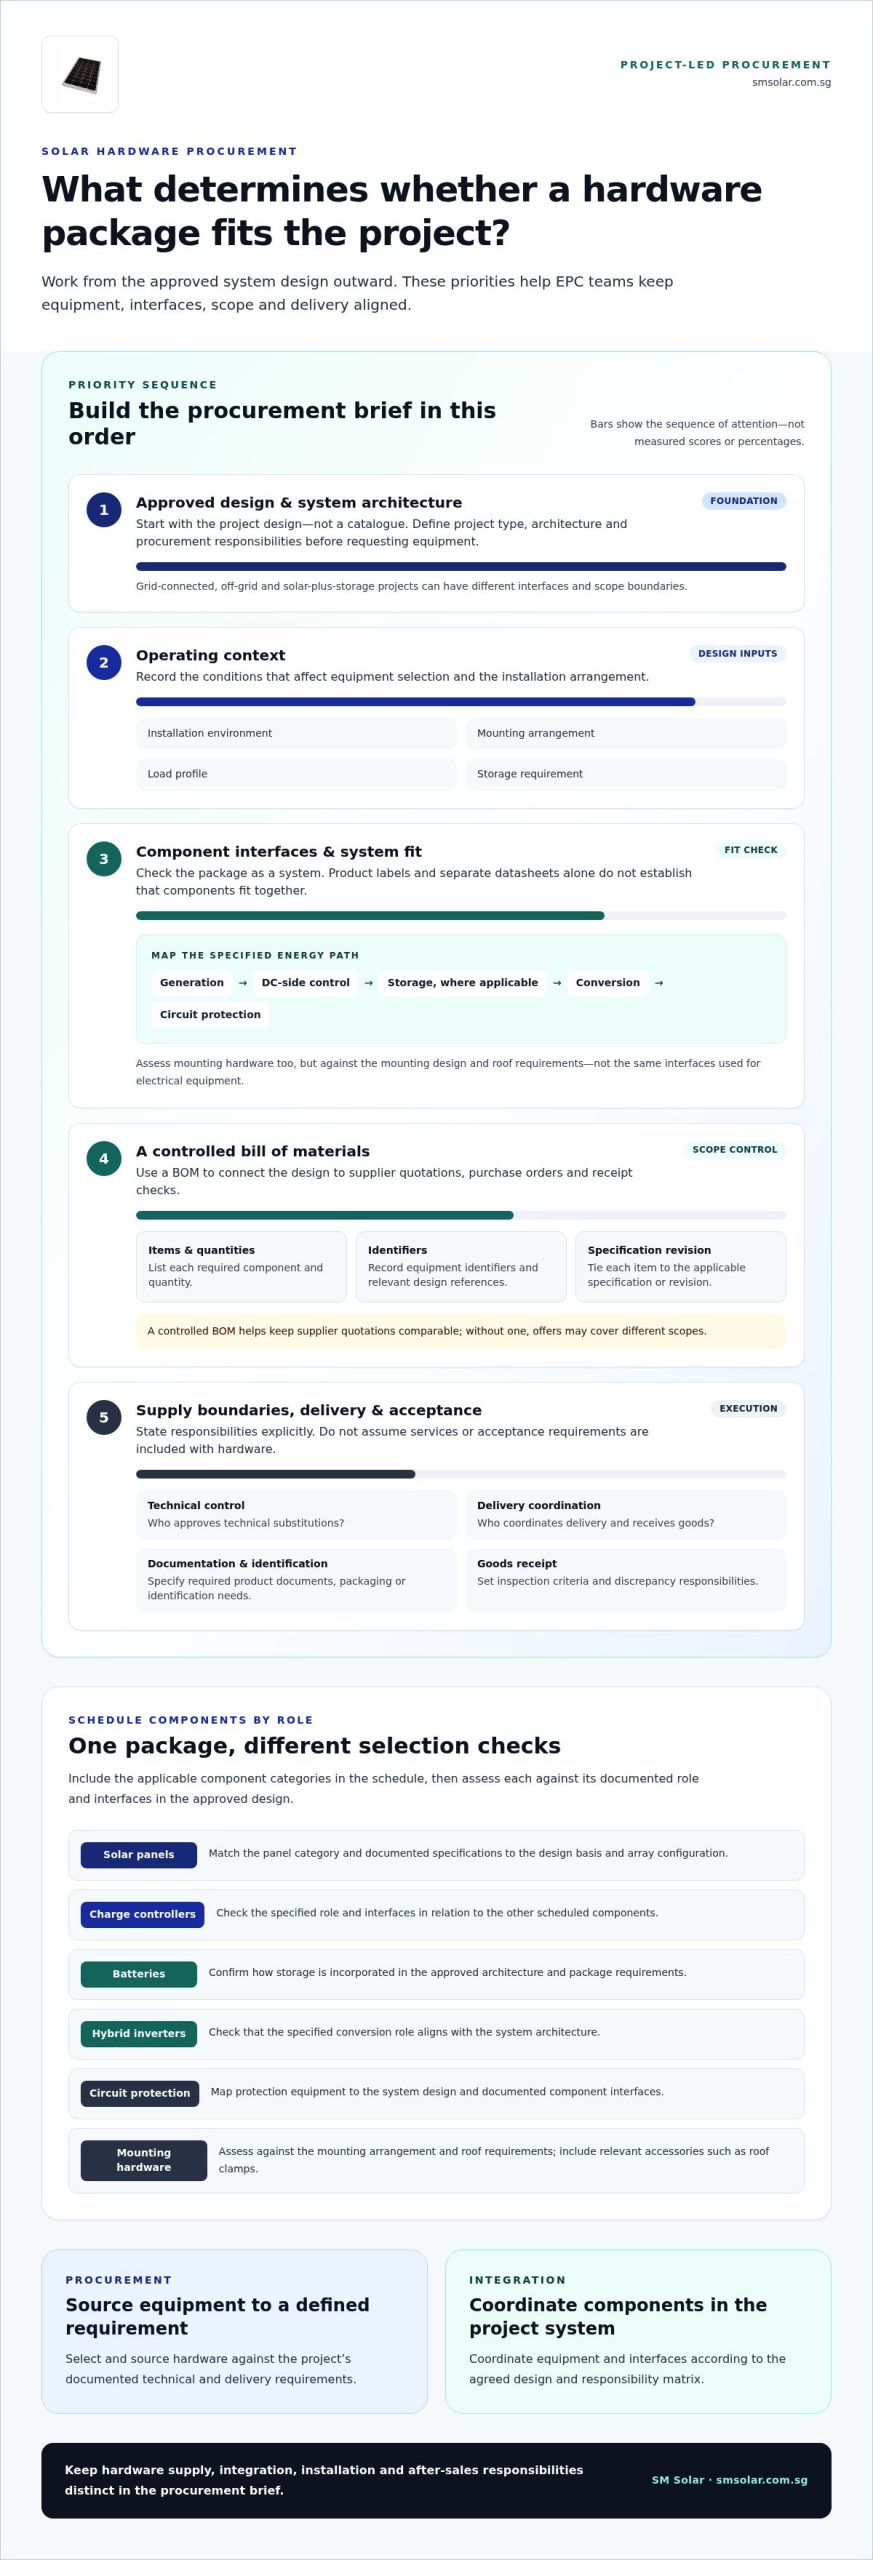
    Solar power hardware procurement means sourcing components against a project’s documented technical and delivery requirements. For an EPC team, the starting point is the approved design, not a catalogue. Define the project type, system architecture, operating context and procurement responsibilities before requesting equipment. A grid-connected array, an off-grid system and a solar-plus-storage configuration can have different component interfaces and scope boundaries.

    Record the operating conditions that affect equipment selection, including the installation environment, mounting arrangement, load profile and any storage requirement. The Solar power overview provides broader context on how solar technologies convert energy into electricity. Procurement decisions, however, should follow the project’s selected design and engineering documentation.

    Separate hardware supply from integration, installation and after-sales responsibilities in the procurement brief. State who approves technical substitutions, coordinates delivery, receives goods and resolves discrepancies. A bill of materials (BOM) connects the design to commercial documents: it identifies each required item and quantity, supports comparable supplier quotations, and provides a reference for purchase orders and receipt checks. Without a controlled BOM, quotations may cover different scopes even when they appear to describe similar packages.

    Hardware procurement sources components to meet a defined system requirement; system integration coordinates those components within the project system.

    What belongs in an EPC solar hardware procurement scope?

    Build the scope from approved design documents. Identify each component category, quantity and project-specific specification, including applicable panels, charge controllers, batteries, hybrid inverters, circuit protection and mounting hardware. Do not rely on product labels alone. Record design references and required interfaces so each quotation can be assessed against the same requirements.

    • Component schedule: List equipment, quantities, identifiers and the relevant design specification or revision.
    • System interfaces: Document how modules connect with storage, conversion, control and protection equipment, including dependencies that affect component selection.
    • Supply and acceptance: State the required product documentation, delivery coordination details, packaging or identification needs, and goods-receipt inspection criteria.

    Keep these requirements distinct in the brief. Documentation, delivery and acceptance are procurement requirements, not implied equipment features. For development projects requiring highway access strategies and planning application documentation, consultancies such as ML Traffic Engineers UK can handle the necessary transport planning requirements. This helps the EPC team identify responsibilities before quotation and order placement.

    How procurement differs from system integration

    Procurement covers selecting and sourcing equipment that meets a defined requirement. Integration covers coordinating equipment and interfaces within the project system, according to the agreed design and responsibility matrix. Installation and after-sales support are separate scope considerations. Assign them explicitly rather than assuming they are part of a hardware order.

    SM Solar is a wholesale distributor of solar hardware, including panels, charge controllers, batteries, circuit protection devices, roof clamp accessories and other DC-related products, with a core focus on 12 V DC products. The company also provides system integration, installation and after-sales maintenance for end users. These capabilities can inform project planning, while each EPC procurement brief should define its equipment and service boundaries.

    Map solar hardware components to their role in the project

    A component schedule is useful only when each item is tied to its function and interface in the approved system design. For solar power hardware procurement, the key question is not whether a panel, battery or inverter looks suitable in isolation. It is whether the selected equipment matches the architecture and connects correctly with the other specified components. The Solar & Storage Supply Chain resource outlines upstream solar manufacturing stages. EPC schedules translate project design into equipment requirements.

    Start with the energy path shown in the design: generation, DC-side control, storage where applicable, conversion, and circuit protection. Then distinguish electrical equipment from mounting hardware. Both belong in the schedule, but their selection criteria differ. A roof clamp, for example, is governed by the mounting design and roof requirements, not the same interfaces used to assess a charge controller.

    Coordinate panels, charge controllers, batteries and inverters

    Use the approved specifications to map how modules connect to control equipment, how storage is incorporated, and how the inverter serves the system architecture. Review technical documentation as a package. Check that stated interfaces and intended functions align across the relevant components, rather than treating separate product datasheets as proof of system fit. The monocrystalline solar panels technical overview and lithium LiFePO4 battery supplier guide provide category-specific context for those schedule entries.

    • Solar panels: Match the panel category and documented specifications to the design basis and array configuration.
    • Charge controllers: Check their specified role and interfaces against the DC-side design and connected equipment.
    • Batteries: Include the specified battery type and system interfaces where storage forms part of the design.
    • Hybrid inverters: Confirm their role in the defined conversion and system architecture.

    This map helps expose missing dependencies before quotation. SM Solar’s DC-focused portfolio includes panels, charge controllers and batteries, which can be considered as related categories within a project-defined package.

    Include mounting and circuit protection in the equipment schedule

    Mounting and protection are not incidental accessories. Include the mounting arrangement in the design basis, then schedule the roof clamps, brackets or pole mounts specified for it. Standing seamlock roof clamps and roof mounting brackets should be assessed against the project’s roof and mounting requirements, not assumed to be interchangeable. List circuit protection devices against their designated positions and functions in the system documentation. The solar circuit protection devices guide offers further category detail.

    Keep these items visible in the bill of materials so they carry through quotation, ordering and receipt checks. EPC teams planning a DC component package can review SM Solar’s solar hardware range against the project design.

    Compare solar hardware procurement options with consistent criteria

    Compare every quotation against the same project baseline. In solar power hardware procurement, a price comparison is not useful if offers differ in equipment scope, specification alignment or assigned responsibilities. Separate mandatory project requirements from preferred supplier capabilities before evaluating options. Mandatory items come from approved design and procurement documents; preferences can distinguish offers without changing the technical basis.

    Criterion
    What to compare
    Specification alignment
    Match equipment descriptions and stated specifications to the approved project documents. Record deviations for technical review.
    Documentation
    Compare the documents provided with the project’s defined submittal and acceptance requirements.
    Component scope
    Check categories and quantities against the bill of materials. Identify exclusions, alternatives and items left for others to supply.
    Project coordination
    Record stated responsibilities for order coordination, delivery information and any separately scoped project support.

    Use a common response format for all offers. Require each quotation to identify equipment, quantities, exclusions and responsibilities clearly. If an item is marked “by others,” record who is responsible for supplying it; otherwise, the package may have a scope gap. Do not infer price suitability, certification status, lead time, warranty terms or supplier performance from incomplete information. Assess only what the quotation and supporting documents state against the project criteria.

    Evaluate technical fit and documentation

    Review equipment descriptions against the approved design, not broad category names. Note interface assumptions, proposed substitutions and unresolved technical dependencies in a comparison record. Apply the same documentation and acceptance requirements to each option. This creates a traceable basis for technical approval and helps prevent a preferred capability from being mistaken for a mandatory specification.

    Assess supply scope and project support

    Map each quoted package to the bill of materials, marking included, excluded and substituted items. Assess integration, installation and after-sales maintenance as distinct support capabilities. Tie responsibility to the project scope rather than assuming it is included with a hardware quotation. The solar energy equipment supplier buyer’s guide provides broader evaluation context.

    Once the comparison criteria are set, record the technical decision and any outstanding conditions before purchase approval. EPC teams assessing component categories can review SM Solar’s solar hardware range against project-defined requirements.

    Solar Power Hardware Procurement: An EPC Project Guide

    Use a controlled procurement workflow from specification to receipt

    A defined workflow keeps the approved design connected to supplier responses, purchase orders and goods receipt. In solar power hardware procurement, assign an owner to each handoff. A responsibility matrix can identify who approves specifications, controls purchasing, coordinates delivery and inspects received equipment. Roles may vary by EPC, but assign each responsibility before issuing the request.

    1. Define scope. Engineering compiles the equipment schedule from approved project documents, records the applicable revision and identifies required documentation, delivery and acceptance conditions.
    2. Issue requirements. Procurement distributes the same schedule and response format to suppliers. Request clear equipment descriptions, quantities, stated exclusions, documentation and responsibility boundaries.
    3. Evaluate offers. Engineering reviews technical alignment and resolves interface questions. Procurement compares scope and commercial terms against the same project baseline, recording deviations and open queries.
    4. Place orders. Purchasing issues orders only after required approvals and clarifications are recorded. The order should reflect the accepted offer, approved substitutions and applicable schedule revision.
    5. Inspect receipts. The assigned receiving or quality role compares delivered items and accompanying documents with the purchase order and approved equipment schedule. Record discrepancies and route them through the project’s established process.

    Prepare the request and evaluate supplier responses

    Issue one controlled equipment schedule with project requirements and requested documentation so responses can be compared consistently. Review technical fit, package scope, exclusions and coordination responsibilities separately. If an offer differs from the schedule, record the discrepancy and obtain an approved clarification before making a purchase commitment. Keep unresolved technical dependencies visible rather than treating silence as acceptance.

    Control changes, delivery and equipment receipt

    Maintain a record of specification revisions, substitutions, exclusions and decisions, then carry approved changes into purchasing and handover records. Coordinate delivery against the current order and schedule. For broader commercial site works where freight staging and heavy vehicle logistics impact surrounding road networks, transport consultancies like mltraffic.com.au provide traffic engineering and access planning. At receipt, check item descriptions, quantities and available documentation against those records. If a discrepancy appears, document it and escalate it through the project’s assigned procurement and quality process before closing receipt.

    Use consistent records across engineering, procurement and receiving. A traceable change history makes it easier to identify which requirement was approved, which equipment was ordered and what arrived. Traceable procurement records keep decisions and responsibilities visible at each project handoff, helping teams manage coordination gaps.

    For project-led sourcing, review SM Solar’s solar hardware range alongside the approved equipment schedule and procurement requirements.

    Work with SM Solar on project-led solar hardware sourcing

    Project-led solar power hardware procurement starts with the approved bill of materials, then connects each required item to a documented technical requirement. SM Solar is a wholesale distributor of solar hardware, including solar panels, charge controllers, batteries and circuit protection devices. Its portfolio also includes roof clamp accessories and other DC-related products, with a core focus on 12 V DC products. This range can inform a project-defined sourcing scope without implying that every project needs the same component package.

    SM Solar was established in 2008 and became a private limited company in 2016. Its wholesale distribution role is distinct from its system integration, installation and after-sales maintenance capabilities for end users. An EPC brief should identify which capabilities apply to the project and assign each responsibility separately.

    Match SM Solar’s hardware categories to the project scope

    Use the approved bill of materials as the starting point. Match each listed component to its project specification, quantity and system interface. For example, a schedule may include panels, charge controllers, batteries and circuit protection alongside roof clamps or brackets where the design specifies them. The schedule, rather than an assumed standard package, determines which categories are relevant.

    • Panels and control equipment: Identify the specified panel and charge controller categories, then tie each to the relevant design documentation.
    • Storage and protection: List batteries and circuit protection devices only as required by the project scope, with relevant interface requirements recorded.
    • Mounting and DC-related items: Include roof clamp accessories and other DC-related products where they appear in the approved design and equipment schedule.

    This category-by-category approach keeps product selection anchored to the project’s technical requirements. It also gives procurement and engineering teams a shared reference for discussing inclusions, substitutions and scope boundaries.

    Prepare a clear procurement brief

    A concise, complete brief helps structure a focused discussion of hardware sourcing and any separately defined integration scope. Include the project overview, approved equipment schedule and applicable technical documents. Identify quantities, required documentation, delivery coordination needs and the project’s acceptance process. If integration or other support is required, describe its intended scope and interfaces separately from the equipment list.

    • Attach the current bill of materials and relevant design revisions.
    • List equipment categories, quantities and project-specific technical requirements.
    • State delivery coordination, documentation and receipt requirements.
    • Define any project-specific integration or end-user support responsibilities.

    With these details prepared, EPC teams can discuss sourcing against an actual project scope rather than a generic product list. Explore SM Solar’s solar hardware supply for project-led procurement planning.

    Carry a clearer procurement basis into your next project

    Make the procurement brief a controlled project reference, not a one-time request document. After each package, capture approved substitutions, recurring clarification points and receipt discrepancies in the team’s procurement records. Use those lessons to refine future equipment schedules and review gates, while keeping each project’s requirements tied to its own approved design. This gives engineering and purchasing teams a shared basis for decisions before orders are released.

    For the next solar power hardware procurement, begin with the project documents and identify which component categories belong in scope. Then align technical review, purchasing and goods receipt around that same baseline. A focused sourcing discussion is easier to start when the equipment schedule and responsibility boundaries are ready.

    Explore SM Solar’s solar hardware supply as you develop a project-specific sourcing scope. A defined procurement basis gives your team a clearer reference for the next project.

    Frequently Asked Questions

    What does solar power hardware procurement include?

    Solar power hardware procurement covers sourcing specified equipment and defining what the supply scope excludes. The brief can distinguish hardware supply from engineering approval, site installation and commissioning responsibilities, which may sit with different project parties. For example, if equipment is supplied without installation, state who manages on-site handling and installation coordination. This boundary clarifies the purchase scope and helps avoid treating a component order as a complete project delivery package.

    How do EPC teams compare solar hardware suppliers?

    EPC teams can compare suppliers using a shared response template tied to the project’s requirements. Check whether each offer identifies the relevant equipment, quantity, supporting documents, exceptions and assigned responsibilities. Record each deviation beside the corresponding schedule line, rather than leaving it in general quotation notes. This helps engineering review technical differences while procurement compares scope, without treating an unstated detail as an agreed commitment.

    Which components should a solar hardware procurement package cover?

    The package should cover components required by the approved design, not every category available in the market. Depending on the system, the schedule may include panels, charge controllers, batteries, hybrid inverters, circuit protection devices and mounting hardware such as clamps or brackets. Use the bill of materials to show which items are in scope and identify associated items supplied under separate packages. That distinction supports clearer purchasing and receipt checks.

    Why should solar components be assessed as a system?

    Solar components should be assessed as a system because individual equipment descriptions do not establish that selected items fit together within the project architecture. A component may meet its own stated requirement but still leave an interface, control or protection dependency unresolved. Reviewing related equipment together helps engineering identify those dependencies before ordering and gives procurement a clearer basis for evaluating substitutions. The approved design remains the reference for determining fit.

    What documents should an EPC include in a solar hardware procurement brief?

    An EPC brief should include the current equipment schedule, relevant design drawings or diagrams, applicable technical specifications and required submittal documents. Add the project’s delivery instructions, goods receipt process and acceptance criteria so the supply scope can be administered consistently. Identify document revisions and the person or function responsible for technical approval. This gives suppliers a defined reference and helps the EPC trace decisions from enquiry through order and receipt.

    How can procurement teams manage substitutions or specification changes?

    Manage substitutions through documented review and approval before updating purchase records. Identify the affected schedule item, the proposed change and any interface documents that engineering needs to reassess. Record the decision and its revision reference, then align the quotation, purchase order and receiving records with the approved change. If equipment arrives against an earlier revision, the receiving team can identify the discrepancy and route it through the project’s change-control process.

    Does SM Solar provide solar hardware as well as project support?

    Yes. SM Solar is a wholesale distributor of solar hardware, including solar panels, charge controllers, batteries, circuit protection devices, roof clamp accessories and other DC-related products. It also provides system integration, installation and after-sales maintenance for end users. These are distinct capabilities, so EPC teams should define hardware supply and any project support separately in the scope and tie requirements to the approved design.

  • Trina Solar SG: Tech Spec Guide for Installers

    Trina Solar SG: Tech Spec Guide for Installers

    The performance gap between high-efficiency N-type modules and standard PERC technology is widest in high-temperature, high-humidity environments like Singapore. You’ve likely encountered the technical hurdles of managing Potential Induced Degradation (PID) while trying to secure reliable local warranty support for large-scale deployments. It’s a common operational challenge. EPCs need precise hardware compatibility and immediate stock availability to meet tight project timelines. This guide serves as a comprehensive technical reference for procuring and installing high-efficiency Trina solar panels SG within the local tropical context.

    We provide the specific data necessary to ensure full compliance with Singapore electrical standards and optimize system longevity. You’ll find detailed specifications on module efficiency, thermal coefficients, and mechanical load ratings. Integration matters. We address compatibility with standing seamlock roof clamps and specialized circuit protection. This analysis streamlines the procurement process by verifying local inventory parameters and technical benchmarks for professional-grade PV installations. By aligning module selection with localized hardware, you can maintain high energy yields and secure long-term asset performance.

    Key Takeaways

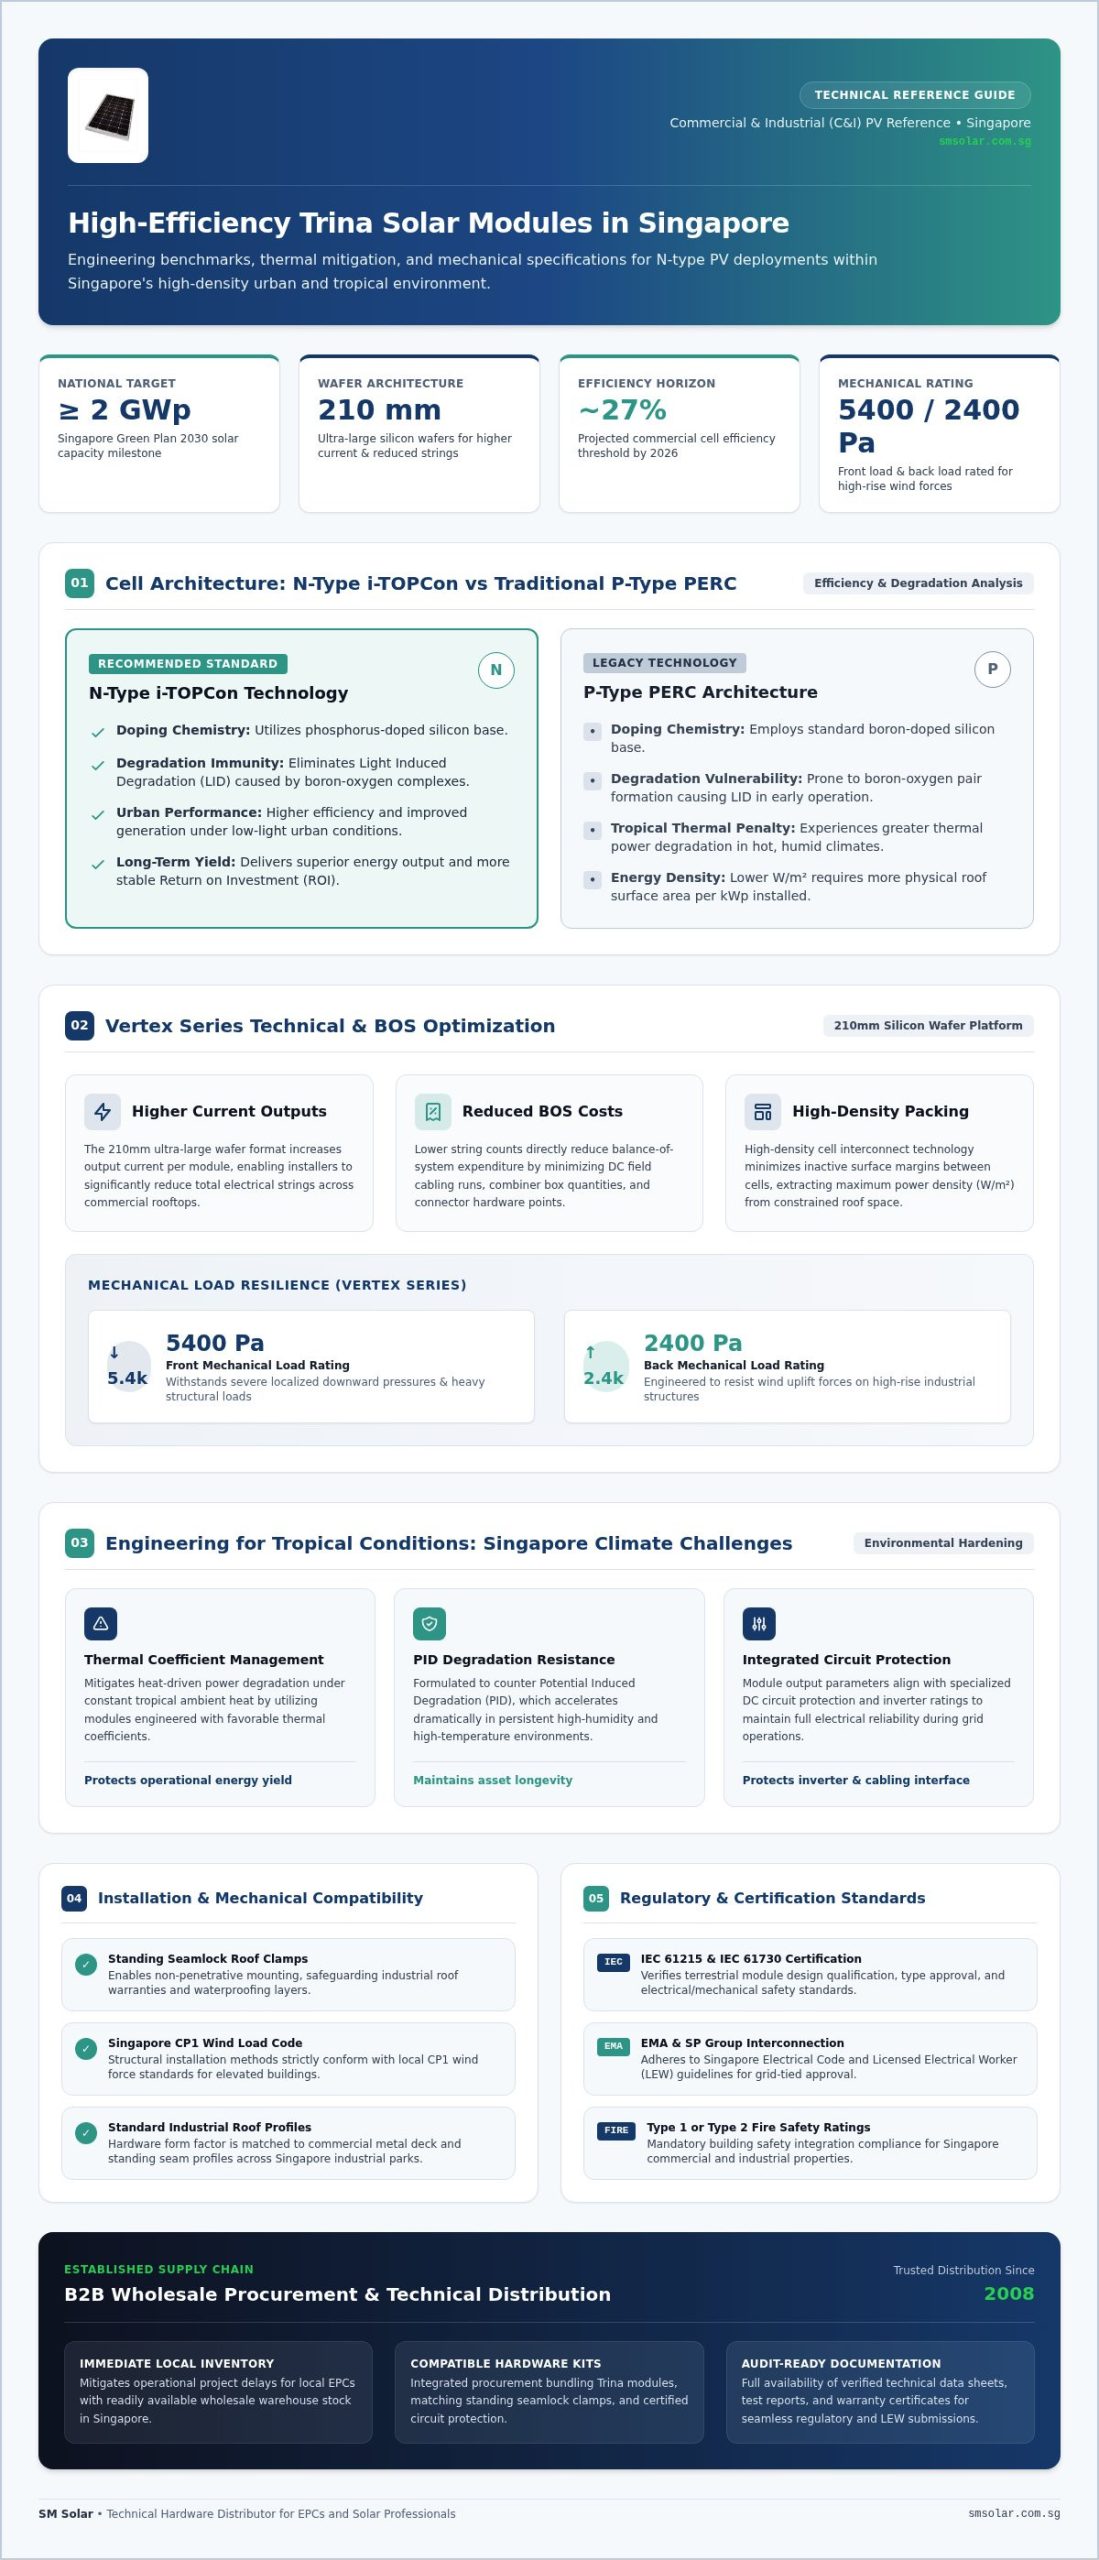
    • Evaluate the performance advantages of N-type i-TOPCon technology over P-type PERC cells to optimize energy yield for high-density urban deployments.
    • Analyze temperature coefficients to mitigate power degradation and manage thermal impacts on Trina solar panels SG within Singapore’s high-humidity environment.
    • Verify mechanical compatibility with standing seamlock roof clamps to ensure non-penetrative mounting that adheres to Singapore CP1 wind load standards.
    • Streamline project timelines by accessing verified wholesale inventory and technical documentation through established B2B logistical channels.

    Trina Solar Modules in the Singapore Energy Market

    Trina Solar maintains a significant presence in Singapore’s commercial and industrial (C&I) sectors, providing the high-efficiency hardware necessary for dense urban deployments. The manufacturer’s global scale and technological milestones, documented by Trina Solar, support large-scale projects requiring monocrystalline technology. This module type dominates the local landscape because of its superior power density compared to older polycrystalline alternatives. These high-performance modules align with the Singapore Green Plan 2030, which targets at least 2 gigawatt-peak (GWp) of solar capacity by 2030. Since 2008, SM Solar has operated as a technical hardware distributor, functioning as a logistical partner for EPCs procuring Trina solar panels SG alongside compatible mounting systems.

    Module Efficiency Standards for Urban Environments

    Singapore’s industrial rooftops often present limited surface area, making power density (W/m²) a primary procurement metric. High-efficiency monocrystalline modules allow installers to maximize energy output within these restricted footprints. Standardizing on high-wattage modules reduces the total number of mounting components and electrical connections required per kilowatt-peak (kWp).

    • N-type i-TOPCon technology: Delivers higher efficiency and better performance in low-light urban conditions compared to traditional P-type cells.
    • Fire Safety Compliance: Modules must meet Type 1 or Type 2 fire rating certifications for building safety integration.
    • Interconnect Density: High-density cell packing technology minimizes inactive space on the module surface to increase total output.

    Regulatory Compliance and EMA Guidelines

    All grid-tied systems in Singapore must comply with technical requirements established by the Energy Market Authority (EMA) and SP Group. Procuring Trina solar panels SG ensures that the core generating components meet the necessary international testing benchmarks for safety and reliability. Industrial project approval depends on the submission of comprehensive technical documentation during the commissioning phase.

    • IEC 61215: Verification of design qualification and type approval for terrestrial PV modules.
    • IEC 61730: Certification for photovoltaic module safety, addressing electrical and mechanical requirements.
    • Grid Connection: Compliance with the Singapore Electrical Code, ensuring that module output parameters align with inverter specifications and circuit protection ratings.

    Installers must verify that all hardware, including standing seamlock roof clamps and solar circuit protection, maintains the integrity of the total system. Reliable procurement through established B2B channels ensures that technical data sheets and warranty documentation are available for regulatory audits.

    Technical Specifications: Vertex and Vertex S+ Series Analysis

    The transition to 210mm ultra-large silicon wafer technology represents a shift in photovoltaic architecture. These larger wafers enable Trina solar panels SG to deliver higher current outputs, which reduces the total number of strings required in a commercial array. This reduction directly lowers Balance of System (BOS) costs by minimizing cabling and combiner box requirements. For industrial installers, the weight-to-power ratio remains a critical structural consideration. Modern Vertex modules provide high power density while maintaining a physical footprint that fits standard industrial roof profiles. Mechanical load specifications are equally vital for high-rise installations. These modules are typically rated for 5400 Pa front load and 2400 Pa back load, providing the necessary resilience against localized wind pressures. Installers should consult the EMA solar implementation guide to ensure system designs meet all Licensed Electrical Worker (LEW) and grid interconnection requirements.

    N-Type i-TOPCon Technology Overview

    N-type i-TOPCon (Industrial Tunnel Oxide Passivated Contact) cells represent the current efficiency benchmark for professional deployments. Unlike P-type PERC cells, N-type architecture uses phosphorus-doped silicon, which eliminates Light Induced Degradation (LID) caused by boron-oxygen complexes. This results in superior long-term energy yields and a more stable Return on Investment (ROI). By 2026, N-type technology is expected to push commercial cell efficiencies toward 27%, establishing a high-performance standard for urban energy systems. Higher bifaciality factors also allow for increased energy harvest in specific mounting configurations where rear-side light is available. Choosing Trina solar panels SG with N-type cells ensures that projects remain technologically relevant for the duration of their 25 to 30 year lifespan.

    Vertex S+ Dual-Glass Specifications

    The Vertex S+ series features a dual-glass structure that replaces the traditional backsheet with a second layer of heat-strengthened glass. This design achieves a Class A fire safety rating, which is essential for meeting Singapore industrial safety standards. The glass-on-glass construction provides an impermeable barrier against moisture and corrosive agents. This durability is particularly relevant for projects in coastal Singapore regions where salt spray and high humidity accelerate degradation in standard modules. These units carry extended product and power warranties, reflecting their structural stability. For technical procurement, you can verify hardware specifications and local availability through established distribution channels.

    Engineering for Tropical Environments: Heat and Humidity

    High ambient temperatures in Singapore directly impact PV voltage and total power output. While standard test conditions (STC) assume 25°C, actual cell temperatures in local industrial zones often exceed 60°C during peak irradiance. This thermal elevation triggers a linear decline in efficiency based on the specific temperature coefficient of the module. Deploying Trina solar panels SG requires a precise assessment of these thermal parameters to ensure accurate energy yield projections. Research from the Solar Energy Research Institute of Singapore confirms that durability testing under local conditions is essential to mitigate long-term degradation. Dual-glass module architectures manage thermal stress more effectively than traditional backsheet designs by providing uniform heat dissipation across the laminate structure.

    Temperature Coefficient and Energy Yield

    Singapore’s daily average temperature of 30°C to 34°C necessitates modules with low Pmax coefficients to maintain system performance. For every degree above the 25°C benchmark, power output decreases. Trina’s N-type modules typically feature a Pmax coefficient of approximately -0.30% per degree Celsius, which is superior to standard P-type alternatives. Lower Nominal Operating Cell Temperature (NOCT) ratings further enhance performance by allowing the module to maintain a lower internal temperature during operation. The Pmax temperature coefficient determines the specific percentage of power loss for every degree Celsius above standard test conditions, directly impacting the cumulative annual energy yield in tropical climates.

    Humidity Resistance and PID Prevention

    High-humidity environments exceeding 80% relative humidity accelerate Potential Induced Degradation (PID). This phenomenon occurs when stray currents leak from the PV cells to the module frame, causing significant power loss over time. Trina addresses this risk through the use of Polyolefin Elastomer (POE) encapsulation. POE provides superior water vapor resistance and lower ionic conductivity compared to standard Ethylene Vinyl Acetate (EVA) films. This material choice is critical for maintaining the dielectric strength of the module in wet conditions.

    • IP68 Junction Boxes: Sealed enclosures prevent moisture ingress during intense monsoon rain cycles.
    • Anodized Aluminum Frames: High corrosion resistance protects structural integrity in salt-laden coastal industrial sectors.
    • Dual-Glass Barrier: The impermeable nature of glass-on-glass construction eliminates the moisture-related cell corrosion common in backsheet-based modules.

    Selecting Trina solar panels SG with these specific tropical engineering features ensures that industrial arrays maintain their rated output despite the environmental rigors of the region. Technical procurement should prioritize these material specifications to secure long-term asset reliability.

    Trina Solar SG: Tech Spec Guide for Installers

    Installation and Mounting Compatibility Standards

    Mechanical integration of Trina solar panels SG requires strict adherence to Singapore CP1 standards for wind load resistance. High-rise industrial buildings in the region are subject to significant wind pressures, particularly during monsoon cycles. Structural compliance depends on the precision of the clamp-to-rib interface and the load-bearing capacity of the mounting rails. Installers must verify that the chosen mounting hardware supports the specific frame dimensions and mechanical load ratings of the Vertex series modules. Grounding and bonding remain mandatory to prevent electrical hazards and ensure system longevity. Frame-to-rail continuity must be established using certified bonding washers or integrated grounding pins within the module clamps. These components ensure that the entire array maintains a common potential, reducing the risk of static buildup and electrical faults.

    Non-Penetrative Mounting for Industrial Roofs

    Industrial deployments often utilize standing seam metal roofs where penetration is prohibited by building warranties. Utilizing Standing Seamlock Roof Clamps allows for secure module attachment without compromising the weatherproof layer. This method distributes mechanical loads across the roof ribs, maintaining structural compliance without the need for drilling. It’s essential for installers to match clamp torque specifications with the module manufacturer’s requirements to avoid frame deformation. This hardware configuration supports the high-wattage Vertex series, ensuring that large-format modules remain stable under localized wind pressures. Non-penetrative solutions are the preferred standard for maintaining the long-term integrity of industrial roof assets while facilitating rapid PV deployment.

    Circuit Protection and Safety Gear

    Electrical safety in 1500V system architectures necessitates specialized DC circuit protection. Singapore’s high lightning density requires the integration of Type 2 surge protection devices (SPDs) within DC combiner boxes. These components protect both the PV array and the downstream power electronics from transient overvoltages. Compatibility with industrial hybrid inverters and MPPT charge controllers must be verified against the module’s maximum power current (Imp) and open-circuit voltage (Voc) values. Proper sizing of solar circuit protection prevents thermal events and equipment failure during system faults.

    • DC Disconnect Switches: Must be rated for full load breaking capacity at maximum system voltage.
    • MPPT Input Windows: Ensure module string configurations stay within the operating voltage range of the inverter.
    • Bonding Conductors: Use of UV-resistant copper cabling for all external grounding paths.

    System reliability depends on the quality of these protective elements and their correct installation. You can procure industrial-grade circuit protection and compatible mounting hardware through our local distribution network to ensure full compliance with Singapore engineering standards.

    Procurement Logistics and Inventory Availability

    Professional procurement requires a dependable logistical partner. SM Solar functions as a master distributor, ensuring the availability of Tier 1 monocrystalline PV modules for high-volume EPC projects. Securing Trina solar panels SG through established B2B channels minimizes the risk of project delays. We maintain inventory reliability by managing the technical hardware supply chain, providing components that meet the rigorous standards of industrial solar deployments. This systematic approach ensures that hardware arrives on-site according to project timelines. Our organization prioritizes functional reliability over marketing narrative, acting as a robust link in the professional supply chain for seasoned industry veterans.

    Wholesale Distribution to Malaysia and Singapore

    Efficient cross-border logistics are essential for regional industrial solar projects. We facilitate bulk procurement pathways for installers operating in both markets, managing the complexities of international transport and inventory allocation. Lead times for bulk orders are optimized through strategic inventory management, ensuring that Tier 1 hardware is accessible for large-scale arrays. Installers seeking Wholesale Solar Panels Malaysia can leverage our established distribution network to streamline their hardware acquisition. This logistical support reduces the administrative burden on EPCs, allowing them to focus on engineering and execution. Consistent stock availability across both regions supports the rapid deployment of high-efficiency PV systems. We ensure that every shipment meets the exact technical requirements specified in the project engineering phase.

    Technical Support and Warranty Claims

    Reliability in the supply chain extends beyond delivery. We provide local technical support for manufacturer warranty verification, serving as a direct point of contact for EPCs. In the event of damaged or defective modules, replacement protocols are managed with technical precision to minimize downtime. Accessing technical data sheets, installation manuals, and certification documents is streamlined through our professional catalog. This ensures that all Trina solar panels SG deployments are backed by the necessary documentation for regulatory compliance and long-term asset management. Our role as a silent partner provides the stability required for high-volume industrial projects. We maintain a high technical register in all communications, providing precise data for engineering reviews and project commissioning. This methodical pacing ensures that procurement professionals feel they’re dealing with a highly organized and efficient operation.

    Optimizing Industrial PV Performance in Singapore

    Successful solar deployment in Singapore’s tropical climate depends on aligning module technology with specialized mounting and circuit protection. N-type i-TOPCon architecture provides the necessary resistance to Potential Induced Degradation (PID) while maintaining high energy yields during peak thermal cycles. Verification of mechanical compatibility with non-penetrative hardware, such as standing seamlock roof clamps, ensures adherence to local engineering standards and protects building warranties. Integration matters for system longevity. Technical precision remains the baseline for all professional arrays.

    SM Solar has operated as a Tier 1 hardware distributor since 2008, specializing in industrial mounting solutions and high-volume logistics. We provide the technical precision required for large-scale EPC projects involving Trina solar panels SG. Professional-grade procurement through a local partner ensures inventory reliability and full compliance with Singapore electrical codes. Inquire for Trina Solar Wholesale Specifications to secure high-efficiency PV modules for your next project.

    Selecting the correct technical specifications and compatible hardware streamlines the installation process and secures long-term asset performance.

    Frequently Asked Questions

    Are Trina solar panels available for immediate wholesale in Singapore?

    SM Solar maintains local inventory for immediate wholesale procurement of Trina solar panels SG. We function as a logistical partner for EPCs, ensuring that Tier 1 monocrystalline modules are available for industrial project timelines. Warehouse operations in Singapore and Malaysia support bulk distribution, reducing lead times for regional installers. Inventory levels are managed to provide consistent access to high-efficiency modules for commercial and industrial deployments.

    What is the difference between Trina Vertex S and Vertex S+ modules?

    The primary difference lies in cell architecture and structural composition. The Vertex S series typically utilizes P-type PERC cells with a traditional backsheet. In contrast, the Vertex S+ series features N-type i-TOPCon technology and a dual-glass structure. This dual-glass design achieves a Class A fire rating and provides superior resistance to moisture ingress. S+ modules generally offer longer product and power warranties due to their enhanced durability.

    How do Trina solar panels perform in Singapore’s high humidity?

    Trina modules are engineered with Polyolefin Elastomer (POE) encapsulation to mitigate the risks associated with Singapore’s high relative humidity. POE provides a superior moisture barrier compared to standard EVA films, effectively preventing Potential Induced Degradation (PID). This material choice maintains the dielectric strength of the module during intense monsoon cycles. These technical specifications ensure that the array maintains its rated output in high-humidity tropical environments over its entire lifespan.

    Can Trina modules be used with non-penetrative standing seam clamps?

    These modules are fully compatible with non-penetrative mounting hardware for industrial standing seam roofs. SM Solar supplies specialized standing seamlock roof clamps that secure the module frame to the roof rib without piercing the weatherproof layer. This configuration preserves building warranties and meets Singapore CP1 wind load requirements. Installers must ensure that clamp torque settings align with Trina’s mechanical load specifications for the Vertex series to prevent frame deformation.

    What is the warranty period for Trina Solar panels in the SG market?

    Warranty terms vary by module series and technology type. Standard Vertex S modules typically carry a 15-year product warranty and a 25-year linear power warranty. The Vertex S+ dual-glass series often features an extended 25-year product warranty and a 30-year power warranty. These warranties cover manufacturing defects and specify maximum annual degradation rates. Local support for warranty verification is available through SM Solar’s distribution office in Singapore.

    Do I need specific circuit protection for a 1500V Trina Solar system?

    High-voltage 1500V system architectures require specialized DC circuit protection to ensure operational safety. This includes DC disconnect switches and surge protection devices (SPDs) rated specifically for 1500V DC operation. Standard 1000V components are insufficient and present a thermal hazard. Proper protection prevents equipment failure during transient overvoltages, which are common in Singapore’s lightning-prone environment. SM Solar stocks compatible 1500V solar circuit protection hardware for industrial arrays.

    Does SM Solar provide installation services for Trina panels?

    SM Solar does not provide installation services, residential cleaning, or consumer financing. Our operations are strictly focused on the B2B distribution of solar energy equipment and hardware. We act as a logistical partner for EPCs and professional installers by providing monocrystalline panels, LiFePO4 batteries, and mounting systems. Installation and commissioning must be performed by a Licensed Electrical Worker (LEW) or a Qualified Person (QP) to meet Singapore standards.

    How does the temperature coefficient of Trina panels affect SG energy yield?

    The temperature coefficient determines the rate of power loss as cell temperatures exceed 25°C. In Singapore, cell temperatures frequently reach 60°C, making a lower coefficient essential for high energy yields. Trina’s N-type modules feature a Pmax coefficient of approximately -0.30% per degree Celsius. This performance metric ensures that Trina solar panels SG maintain higher efficiency during peak midday irradiance compared to older P-type technology with higher thermal degradation rates.